今天笔者简单复习一下之前学过的Spring的开发的相关的知识,很多都是概念性的东西。但是这些东西还是有必要学习的,毕竟对于一项技术不仅要知其然还要知其所以然,这样子才能算掌握了一项技术。
一、Spring的相关知识
spring(由Rod Johnson创建的一个开源框架)
Spring是一个开放源代码的设计层面框架,他解决的是业务逻辑层和其他各层的松耦合问题,因此它将面向接口的编程思想贯穿整个系统应用。Spring是于2003 年兴起的一个轻量级的Java 开发框架,由Rod Johnson创建。简单来说,Spring是一个分层的JavaSE/EEfull-stack(一站式) 轻量级开源框架。——百度百科
Spring是一个开源框架,Spring是于2003 年兴起的一个轻量级的Java 开发框架,由Rod Johnson在其著作 Expert One-On-One J2EE Development and Design 中阐述的部分理念和原型衍生而来。它是为了解决企业应用开发的复杂性而创建的。框架的主要优势之一就是其分层架构,分层架构允许使用者选择使用哪一个组件,同时为 J2EE 应用程序开发提供集成的框架。Spring 使用基本的 JavaBean来完成以前只可能由 EJB 完成的事情。然而,Spring 的用途不仅限于服务器端的开发。从简单性、可测试性和松耦合的角度而言,任何 Java 应用都可以从 Spring 中受益。Spring 的核心是控制反转(IOC)和面向切面(AOP)。简单来说,Spring 是一个分层的 JavaSE/EEfull-stack(一站式) 轻量级开源框架。
如果单单使用Spring框架来开发的话,那么相关的EE可以分为以下三层结构:
* WEB 层:Spring MVC
* 业务层:Bean 管理:(IOC)
* 持久层:Spring 的 JDBC 模板,ORM 模板用于整合其他的持久层框架
Expert One-to-One J2EE Design and Development :J2EE 的设计和开发:(2002.EJB)
Expert One-to-One J2EE Development without EJB :J2EE 不使用 EJB 的开发
二、学习Spring的好处
(1)方便解耦,简化开发
Spring 就是一个大工厂,可以将所有对象创建和依赖关系维护,交给 Spring 管理
(2)AOP 编程的支持
Spring 提供面向切面编程,可以方便的实现对程序进行权限拦截、运行监控等功能
(3)声明式事务的支持
只需要通过配置就可以完成对事务的管理,而无需手动编程
(4)方便程序的测试
Spring 对 Junit4 支持,可以通过注解方便的测试 Spring 程序
(5)方便集成各种优秀框架
Spring 不排斥各种优秀的开源框架,其内部提供了对各种优秀框架(如:Struts、Hibernate、MyBatis、Quartz 等)的直接支持
(6)降低 JavaEE API 的使用难度
Spring 对 JavaEE 开发中非常难用的一些 API(JDBC、JavaMail、远程调用等),都提供了封装,使这些 API 应用难度大大降低
三、关于Spring的版本
Spring3.x、Spring4.x
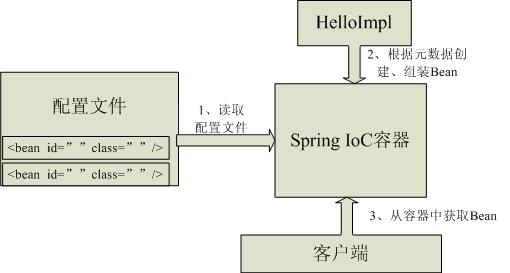
四、关于Spring的IOC(Inversion of Control)的简单介绍
4.1SpringIOC的底层原理:
关于Spring的IOC原理的话,将来笔者再专门开一个专题进行学习。
总之,关于Spring的IOC可以这样理解:将对象的创建权反转(交给)给 Spring,这样子做的作用是实现了程序的解耦合。
4.2简单实现Spring的IOC开发
步骤一:下载相关的Spring的开发包
官网:http://spring.io/
下载地址:
http://repo.springsource.org/libs-release-local/org/springframework/spring

下载完成之后,将压缩包解压,出现如下的目录:
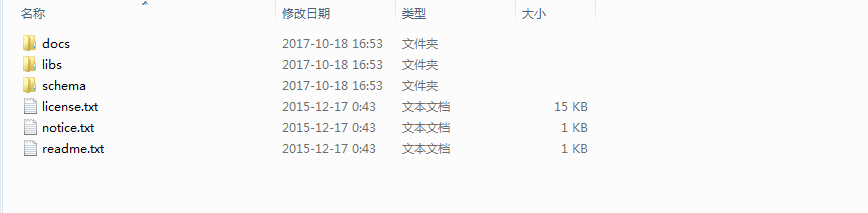
各个文件夹的含义是:
* docs:API 和开发规范
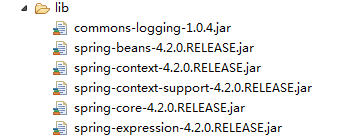
* libs:jar 包和源码
* schema:约束
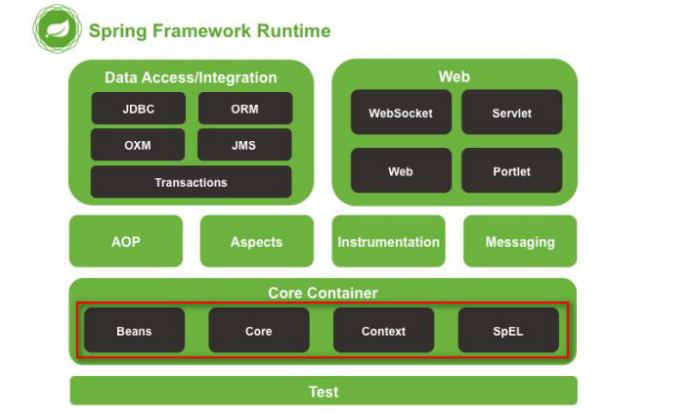
步骤二、创建一个WEB项目,并且导入相关的Jar包
在导包之前先介绍Spring的七大模块:
导包:
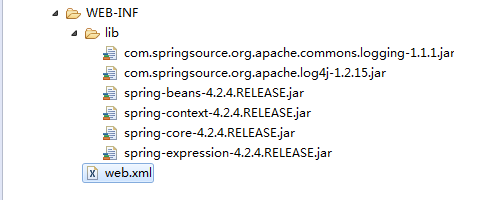
步骤三、导入包完成之后,配置相关的配置文件
根据我们导入的包来看我们需要配置的文件有以下两个:
log4j.properties
applicationContext.xml:
<?xml version="1.0" encoding="UTF-8"?>
<beans xmlns="http://www.springframework.org/schema/beans"
    xmlns:xsi="http://www.w3.org/2001/XMLSchema-instance" xmlns:p="http://www.springframework.org/schema/p"
    xmlns:context="http://www.springframework.org/schema/context"
    xmlns:aop="http://www.springframework.org/schema/aop" xmlns:tx="http://www.springframework.org/schema/tx"
    xsi:schemaLocation="http://www.springframework.org/schema/beans
    http://www.springframework.org/schema/beans/spring-beans-3.0.xsd
    http://www.springframework.org/schema/context
    http://www.springframework.org/schema/context/spring-context-3.0.xsd
    http://www.springframework.org/schema/tx
    http://www.springframework.org/schema/tx/spring-tx-3.0.xsd
    http://www.springframework.org/schema/aop
    http://www.springframework.org/schema/aop/spring-aop-3.0.xsd">

</beans>
步骤四、编写相关的类
接口类:
package com.ygh.dao;
/**
 * 编写用户接口类
 * @author 夜孤寒
 * @version 1.1.1
 */
public interface UserDao {
    public void sayHello();
}
接口实现类:
package com.ygh.dao.impl;

import com.ygh.dao.UserDao;
/**
 * 用户接口类的实现类
 * @author 夜孤寒
 * @version 1.1.1
 */
public class UserDaoImpl implements UserDao {

    @Override
    public void sayHello() {
        // TODO Auto-generated method stub
        System.out.println("This is my first Spring test...");
    }

}
步骤五、完成相关的配置
application.xml的配置:
<?xml version="1.0" encoding="UTF-8"?>
<beans xmlns="http://www.springframework.org/schema/beans"
    xmlns:xsi="http://www.w3.org/2001/XMLSchema-instance" xmlns:p="http://www.springframework.org/schema/p"
    xmlns:context="http://www.springframework.org/schema/context"
    xmlns:aop="http://www.springframework.org/schema/aop" xmlns:tx="http://www.springframework.org/schema/tx"
    xsi:schemaLocation="http://www.springframework.org/schema/beans
    http://www.springframework.org/schema/beans/spring-beans-3.0.xsd
    http://www.springframework.org/schema/context
    http://www.springframework.org/schema/context/spring-context-3.0.xsd
    http://www.springframework.org/schema/tx
    http://www.springframework.org/schema/tx/spring-tx-3.0.xsd
    http://www.springframework.org/schema/aop
    http://www.springframework.org/schema/aop/spring-aop-3.0.xsd">
    <!-- 配置相关的bean -->
    <bean id="userDao" class="com.ygh.dao.impl.UserDaoImpl"></bean>
</beans>
步骤六、使用JUnit编写测试文件
package com.ygh.test;

import org.junit.Test;
import org.springframework.context.ApplicationContext;
import org.springframework.context.support.ClassPathXmlApplicationContext;

import com.ygh.dao.UserDao;

/**
 * 测试类,使用Junit,使用Junit之前记得需要在对象项目导一下包
 *
 * @author 夜孤寒
 * @version 1.1.1
 */
public class TestDemo {
    @Test
    public void demo() {
        // 读取xml文件
        ApplicationContext applicationContext = new ClassPathXmlApplicationContext("applicationContext.xml");
        UserDao userDao = (UserDao) applicationContext.getBean("userDao");
        userDao.sayHello();
    }
}
测试结果如下所示:

红色部分是因为没有编写log4j.xml文件。
五、IOC和DI两种注入方式
接下来介绍的是Spring的两种注入方式——IOC和DI注入方式:
在介绍两种注入方式之前,我们仍旧需要做的工作就是导包,并且将XML配置文件的框架搭好,如下所示:
导包:
搭建XML配置文件的骨架:
<?xml version="1.0" encoding="UTF-8"?>

<beans xmlns="http://www.springframework.org/schema/beans"
    xmlns:xsi="http://www.w3.org/2001/XMLSchema-instance" xmlns:p="http://www.springframework.org/schema/p"
    xmlns:context="http://www.springframework.org/schema/context"
    xmlns:aop="http://www.springframework.org/schema/aop" xmlns:tx="http://www.springframework.org/schema/tx"
    xsi:schemaLocation="http://www.springframework.org/schema/beans
    http://www.springframework.org/schema/beans/spring-beans-3.0.xsd
    http://www.springframework.org/schema/context
    http://www.springframework.org/schema/context/spring-context-3.0.xsd
    http://www.springframework.org/schema/tx
    http://www.springframework.org/schema/tx/spring-tx-3.0.xsd
    http://www.springframework.org/schema/aop
    http://www.springframework.org/schema/aop/spring-aop-3.0.xsd">

</beans>
5.1DI注入方式介绍:
使用DI注入方式前奏:将Animal和People的接口以及实现类都写好,然后根据需要,使用DI注入达到目的:
首先配置好XML文件相关的配置,spring.xml:
<?xml version="1.0" encoding="UTF-8"?>

<beans xmlns="http://www.springframework.org/schema/beans"
    xmlns:xsi="http://www.w3.org/2001/XMLSchema-instance" xmlns:p="http://www.springframework.org/schema/p"
    xmlns:context="http://www.springframework.org/schema/context"
    xmlns:aop="http://www.springframework.org/schema/aop" xmlns:tx="http://www.springframework.org/schema/tx"
    xsi:schemaLocation="http://www.springframework.org/schema/beans
    http://www.springframework.org/schema/beans/spring-beans-3.0.xsd
    http://www.springframework.org/schema/context
    http://www.springframework.org/schema/context/spring-context-3.0.xsd
    http://www.springframework.org/schema/tx
    http://www.springframework.org/schema/tx/spring-tx-3.0.xsd
    http://www.springframework.org/schema/aop
    http://www.springframework.org/schema/aop/spring-aop-3.0.xsd">
    <!-- 设置DI注入方式的两种注入方式:
            属性注入方式;(在Boy类中实现)
            构造方法注入方式。(在Girl类中实现)
       两种方式混合起来使用。(Girl_2类中实现)
     -->
     <!-- 属性注入的方式 -->
     <bean name="dog" class="com.spring.di.Dog"></bean>
     <bean name="cow" class="com.spring.di.Cow"></bean>
     <bean name="boy" class="com.spring.di.Boy" abstract="false">
         <!-- 表示在我们的boy中去引用我们的Cow -->
         <property name="animal" ref="cow"></property>
     </bean>
     <!--
         属性注入方式小结:
             如上配置,我们是要在Boy中去引用我们的Cow类的方法,
             需要在Boy这个类中先给他添加一个属性animal,并且添加get、set方法,
             然后去获取容器,让他能实现调用。
      -->

     <!-- 构造方法注入的方式 -->
     <bean name="girl" class="com.spring.di.Girl" abstract="false">
         <constructor-arg name="username" value="用户名"></constructor-arg>
         <constructor-arg name="animal" ref="dog"></constructor-arg>
     </bean>
     <!--
         构造方法注入的方式总结:
             如上配置,并且我们要给实现类创建一个带参数的构造方法,
             所以在创建构造方法之前我们需要先写我们的属性。
      -->
     <!-- 构造方法注入和属性注入的方式同时存在的情况下 -->
     <bean name="girl_2" class="com.spring.di.Girl_2" abstract="false">
         <!-- constructor-arg是构造方法注入的方式 -->
         <constructor-arg name="username" value="用户名"></constructor-arg>
         <!-- property是属性注入的方式,为了区分,一个引用的是dog,一个引用的是cow -->
         <property name="animal" ref="dog"></property>
         <constructor-arg name="animal" ref="cow"></constructor-arg>
     </bean>
     <!--
         构造方法注入和属性注入的方式同时存在的情况下:
             当这两种都存在的情况之下,其实两种注入方式都是生效的,
             但是我们一般都是先调用构造方法注入的这种方式,然后在去调用属性注入的方式,
             这时候后者就会覆盖了前者,导致我们的注入方式出现了问题。
      -->
</beans>
Animal接口:
package com.spring.di;

/**
 * 创建一个Animal接口,其他的两个动物来实现他的方法
 * @author 夜孤寒
 * @version 1.1.1
 */
public interface Animal {
    public void bark();// 动物都能叫
}
Animal接口的两个实现类:
package com.spring.di;
/**
 * 奶牛实现Animal接口,实现其方法
 * @author 夜孤寒
 * @version 1.1.1
 *
 */
public class Cow implements Animal {

    @Override
    public void bark() {
        System.out.println("Cow这个类中的bark方法...");
    }
}
package com.spring.di;
/**
 * 狗实现Animal接口,实现其方法
 * @author 夜孤寒
 * @version 1.1.1
 *
 */
public class Dog implements Animal {

    @Override
    public void bark() {
        System.out.println("Dog这个类中的bark方法...");
    }

}
People接口:
package com.spring.di;
/**
 * People接口其中有一个beat方法
 * @author 夜孤寒
 *
 */
public interface People {
    public void beat();//打败小动物
}
People接口的实现类之Boy(使用属性注入的方式):
package com.spring.di;

import org.springframework.context.ApplicationContext;
import org.springframework.context.support.ClassPathXmlApplicationContext;
/**
 * People接口的实现方法,使用属性注入的方式
 * @author Administrator
 * @version 1.1.1
 */
public class Boy implements People {
    //使用属性注入的方法
    private Animal animal;

    public Animal getAnimal() {
        return animal;
    }

    public void setAnimal(Animal animal) {
        this.animal = animal;
    }

    @Override
    public void beat() {
        /*
         * 使用DI方式注入的方式之属性注入
         */
        System.out.println("Boy这个类中的beat方法==>");
        this.animal.bark();
    }

    public static void main(String[] args) {
        @SuppressWarnings("resource")
        ApplicationContext context = new ClassPathXmlApplicationContext(
                "spring.xml");
        People people=(People) context.getBean("boy");
        people.beat();
    }

}
输出结果:

People接口的实现类之Girl(使用构造方法注入的方式):
package com.spring.di;

import org.springframework.context.ApplicationContext;
import org.springframework.context.support.ClassPathXmlApplicationContext;

/**
 * DI注入之使用构造方法注入的方式
 * @author 夜孤寒
 * @version 1.1.1
 */
public class Girl implements People {
    private Animal animal;
    private String username;
    //构造方法
    public Girl(Animal animal,String username){
        this.animal=animal;
        this.username=username;
    }
    @Override
    public void beat() {
        System.out.println("Girl这个类中的beat方法...");
        this.animal.bark();
    }
    public static void main(String[] args) {
        @SuppressWarnings("resource")
        ApplicationContext context=new ClassPathXmlApplicationContext("spring.xml");
        Girl girl=(Girl) context.getBean("girl");
        girl.beat();
        System.out.println(girl.username);//输出我们在配置文件中为username注入的值
    }
}
输出结果:

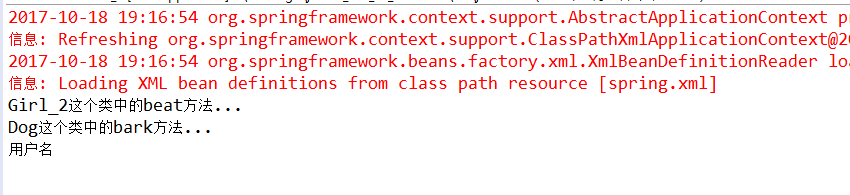
People接口的实现类之Girl_2(使用两种方式混合注入的方式):
package com.spring.di;

import org.springframework.context.ApplicationContext;
import org.springframework.context.support.ClassPathXmlApplicationContext;

/**
 * 使用DI注入方式的时候,当我们的属性注入方式和我们的构造方法注入的方式同时存在的时候。
 * @author 夜孤寒
 * @version 1.1.1
 */
public class Girl_2 implements People{
    private String username;
    private Animal animal;
    //DI注入之属性注入
    public Animal getAnimal() {
        return animal;
    }

    public void setAnimal(Animal animal) {
        this.animal = animal;
    }
    //DI注入之构造方法注入的方式
    public Girl_2(Animal animal,String username){
        this.animal=animal;
        this.username=username;
    }

    @Override
    public void beat() {
        System.out.println("Girl_2这个类中的beat方法...");
        this.animal.bark();
    }
    public static void main(String[] args) {
        @SuppressWarnings("resource")
        ApplicationContext context = new ClassPathXmlApplicationContext(
                "spring.xml");
        Girl_2 girl_2=(Girl_2) context.getBean("girl_2");
        girl_2.beat();
        System.out.println(girl_2.username);
    }
}
输出结果:
5.2IOC注入方式介绍
首先我们先来看一下XML配置,spring.xml:
<?xml version="1.0" encoding="UTF-8"?>
<beans xmlns="http://www.springframework.org/schema/beans"
    xmlns:xsi="http://www.w3.org/2001/XMLSchema-instance" xmlns:p="http://www.springframework.org/schema/p"
    xmlns:context="http://www.springframework.org/schema/context"
    xmlns:aop="http://www.springframework.org/schema/aop" xmlns:tx="http://www.springframework.org/schema/tx"
    xsi:schemaLocation="http://www.springframework.org/schema/beans
    http://www.springframework.org/schema/beans/spring-beans-3.0.xsd
    http://www.springframework.org/schema/context
    http://www.springframework.org/schema/context/spring-context-3.0.xsd
    http://www.springframework.org/schema/tx
    http://www.springframework.org/schema/tx/spring-tx-3.0.xsd
    http://www.springframework.org/schema/aop
    http://www.springframework.org/schema/aop/spring-aop-3.0.xsd">


    <!-- 设置IOC注入的方式 -->
    <!--
        注意点1、这里面的abstract不能够使用抽象类,也就是说我们引用的类不能够是抽象类;
        注意点2、这里面的scope属性有五个值:
            singleton:单例模式;
            request:request表示该针对每一次HTTP请求都会产生一个新的bean,同时该bean仅在当前HTTP request内有效;
            prototype:prototype作用域部署的bean,每一次请求(将其注入到另一个bean中,或者以程序的方式调用容器的 getBean()方法)都会产生一个新的bean实例,
              相当与一个new的操作,对于prototype作用域的bean,有一点非常重要,那就是,Spring不能对一个prototype bean的整个生命周期负责,
                       容器在初始化、配置、装饰或者是装配完一个prototype实例后,将它交给客户端,随后就对该prototype实例不闻不问了。
                       不管何种作用域,容器都会调用所有对象的初始化生命周期回调方法,而对prototype而言,任何配置好的析构生命周期回调方法都将不会被调用。
                       清除prototype作用域的对象并释放任何prototype bean所持有的昂贵资源,都是客户端代码的职责。
                       (让Spring容器释放被singleton作用域bean占用资源的一种可行方式是,通过使用 bean的后置处理器,该处理器持有要被清除的bean的引用。)
            session:session作用域表示该针对每一次HTTP请求都会产生一个新的bean,同时该bean仅在当前HTTP session内有效;
            global session:global session作用域类似于标准的HTTP Session作用域,不过它仅仅在基于portlet的web应用中才有意义。
                           Portlet规范定义了全局Session的概念,它被所有构成某个 portlet web应用的各种不同的portlet所共享。
                           在global session作用域中定义的bean被限定于全局portlet Session的生命周期范围内。
                           如果你在web中使用global session作用域来标识bean,那么web会自动当成session类型来使用。
     -->
    <bean name="person" class="com.spring.ioc.Woman" scope="" abstract="false" ></bean>
</beans>
Person接口:
package com.spring.ioc;
/**
 * Person接口的实现方法
 * @author 夜孤寒
 * @version 1.1.1
 *
 */
public interface Person {
    public void eat();
    public void sleep();
}
Person接口的实现类——Man:
package com.spring.ioc;
/**
 * Man
 * @author 夜孤寒
 * @version 1.1.1
 */
public class Man implements Person {

    @Override
    public void eat() {
        System.out.println("Man中的eat方法...");
    }

    @Override
    public void sleep() {
        System.out.println("Man中的sleep方法...");
    }

}
Person接口的实现类——Woman:
package com.spring.ioc;
/**
 * Woman
 * @author 夜孤寒
 * @version 1.1.1
 *
 */
public class Woman implements Person {

    @Override
    public void eat() {
        System.out.println("Woman中的eat方法...");
    }

    @Override
    public void sleep() {
        System.out.println("Woman中的sleep方法...");
    }

}
下面我们来测试一下使用原始方法和使用IOC注入的方式来测试:
原始方式来调用方法,需要创建对象:
package com.spring.ioc;
/**
 * 使用最原始的方式来调用方法
 * @author 夜孤寒
 * @version 1.1.1
 */
public class TestMain {
    public static void main(String[] args) {
        //最原始的方式来调用方法
        Person person=new Man();//调用Man中的eat方法
        /*
         * 当我们要改成调用Woman中的eat方法的时候,
         * 就要将我们的“Man()”改成“Woman()”,这样子的话程序的耦合度就会比较高
         */
        person.eat();
        //回收对象的两种方式
        person=null;//方式一
        System.gc();//方式二
    }
}
使用IOC方式注入,不需要创建对象,而是将创建对象这个工作交给Spring来做。
package com.spring.ioc;

import org.springframework.context.ApplicationContext;
import org.springframework.context.support.ClassPathXmlApplicationContext;

/**
 * 使用IOC注入的方式来调用
 * @author 夜孤寒
 * @version 1.1.1
 */
public class TestByIOC {
    public static void main(String[] args) {
        //使用容器读取配置文件
        @SuppressWarnings("resource")
        ApplicationContext context = new ClassPathXmlApplicationContext(
                "spring.xml");
        /*
         * 实例化一个对象,首先需要获取到我们的bean对象,
         * 注意这里的person与我们的配置文件里面的name要一致。
         */
        Person person=(Person) context.getBean("person");
        person.eat();
        person.sleep();
        /*
         * 小结:这样子我们使用IOC注入的方式就结束了,当我们需要调用Woman这个实现类的方法的时候,
         * 我们只需要到我们的配置文件里面讲class这个属性的值改掉就可以了。
         */
    }
}
输出结果:

5.3总结
IOC:控制反转,将对象的创建权交给了 Spring。
DI:Dependency Injection 依赖注入。需要有 IOC 的环境,Spring 创建这个类的过程中,Spring 将类的依赖的属性设置进去。