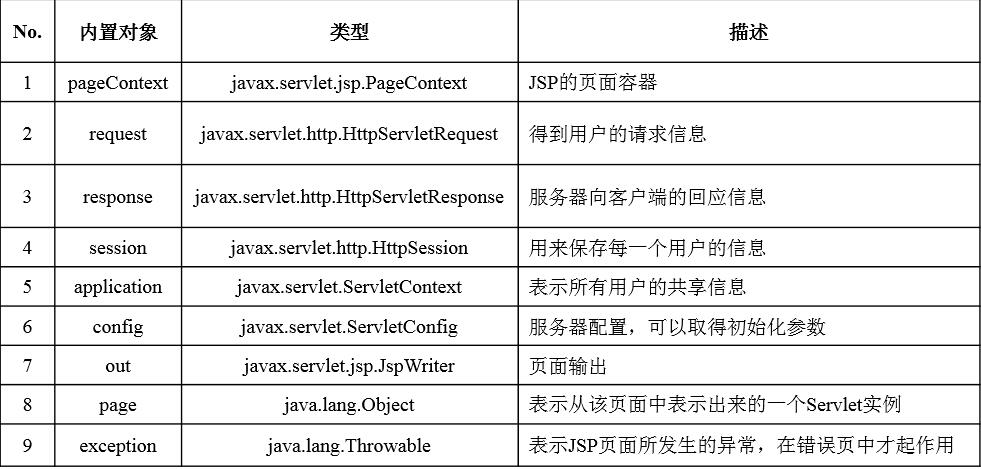
jsp为用户提供了9个内置对象,该内置对象由容器进行实例化,用户直接使用即可;
1 四种属性范围
所谓的属性保存范围:指一个设置的对象可以在几个页面中保存可以继续使用;
属性操作方法:
public void setAttribute(String name, Object obj) 设置属性的名称及内容;
public Object getAttribute(String name) 根据属性名称取得属性;
public void removeAttribute(String name) 根据属性名称删除属性;
四种属性范围:
page(pageContext ,习惯于将这种范围称为page范围): 只在一个页面中保存属性,跳转之后无效;
<%@ page contentType="text/html" pageEncoding="GBK"%>
<%@ page import="java.util.*"%>        <!-- 导入java.util包 -->
<html>
<head><title>设置和取得page范围的属性</title></head>
<body>
<%    // 设置page属性范围,此属性只在当前的JSP页面中起作用
    pageContext.setAttribute("name","bugshi") ;
    pageContext.setAttribute("birthday",new Date()) ;
%>
<%    // 从page属性范围中取出属性,并执行向下转型操作
    String username = (String)pageContext.getAttribute("name") ;
    Date userbirthday = (Date)pageContext.getAttribute("birthday") ;
%>
<h2>姓名:<%=username%></h2>            <!-- 输出取得的属性内容 -->
<h2>生日:<%=userbirthday%></h2>        <!-- 输出取得的属性内容 -->
</body>
</html>
request : 只在一次请求中保存,服务器跳转后依然有效;
<%@ page contentType="text/html" pageEncoding="GBK"%>
<%@ page import="java.util.*"%>        <!-- 导入java.util包 -->
<html>
<head><title>设置requset属性的范围</title></head>
<body>
<%    // 设置request属性范围,此属性只在服务器跳转中起作用
    request.setAttribute("name","bugshi") ;
    request.setAttribute("birthday",new Date()) ;
%>
<jsp:forward page="request_demo02.jsp"/>
</body>
</html>
request_demo02.jsp :
<%@ page contentType="text/html" pageEncoding="GBK"%>
<%@ page import="java.util.*"%>        <!-- 导入java.util包 -->
<html>
<head><title>取出request属性的范围</title></head>
<body>
<%    // 从request属性范围中取出属性,并执行向下转型操作
    String username = (String)request.getAttribute("name") ;
    Date userbirthday = (Date)request.getAttribute("birthday") ;
%>
<h2>姓名:<%=username%></h2>        <!-- 输出取得的属性内容 -->
<h2>生日:<%=userbirthday%></h2>    <!-- 输出取得的属性内容 -->
</body>
</html>
使用超链接取得属性
<%@ page contentType="text/html" pageEncoding="GBK"%>
<%@ page import="java.util.*"%>        <!-- 导入java.util包 -->
<html>
<head><title>www.mldnjava.cn,MLDN高端Java培训</title></head>
<body>
<%    // 设置request属性范围,此属性只在服务器跳转中起作用
    request.setAttribute("name","李兴华") ;
    request.setAttribute("birthday",new Date()) ;
%>
<!-- 通过超链接跳转之后,地址栏改变,属于客户端跳转 -->
<a href="request_demo02.jsp">通过超链接取得属性</a>
</body>
</html>
request属性范围理解:
request表示客户端的请求,正常情况下,一次请求服务器只给一次回应;
如果是服务器跳转,地址栏没有改变,则相当于回应了一次;
如果是地址栏变了,表示发送了第二次请求,则第一次请求的内容消失了,所以无法取得;
session:在一次会话中保存,无论如何跳转(客户端或服务端)都可以使用,但新开浏览器无法使用;
每一个新的浏览器连接上服务器都是一个新的Session Id;
application:整个服务器上保存,所有用户都可以使用;
application范围的属性设置过多会影响服务器的性能;
application范围的属性无论打开多少个浏览器都可以访问到,如果服务器重启,则之前设置的全部属性将消失。
深入page属性范围
设置属性的方法:
public void setAttribute(String name,Object value,int scope) 设置属性并保存范围;
int scope:此变量可指定一个属性的保存范围;
在javax.servlet.jsp.pageContext类中,同样存在4个表示属性范围的整形变量,通过这些整形变量在指定scope的内容;
<%@ page contentType="text/html" pageEncoding="GBK"%>
<%@ page import="java.util.*"%>
<html>
<head><title>request属性范围</title></head>
<body>
<%    // 设置属性
    pageContext.setAttribute("name","bugshi",PageContext.REQUEST_SCOPE) ;
    pageContext.setAttribute("birthday",new Date(),PageContext.REQUEST_SCOPE) ;
%>
<jsp:forward page="request_demo02.jsp"/>
</body>
</html>
pageContext对象可以设置任意范围的属性,而其它操作也只是对这一功能的在包装而已;
但一般习惯于使用pageContext对象设置保存在一页范围的属性,而很少使用pageContext设置其它范围的属性;
2 内置对象
2.1 request对象:使用最多的一个对象
作用:接收客户端发送而来的请求信息,如请求的参数,发送的头信息;
request是javax.servlet.http.HttpServletRequest接口的实例化对象,表示此对象应用在http协议上;
接口定义:public interface HttpServletRequest extends ServletRequest;
查询request对象的方法除了要查询HttpServletReques接口,也要查询ServletRequest接口;
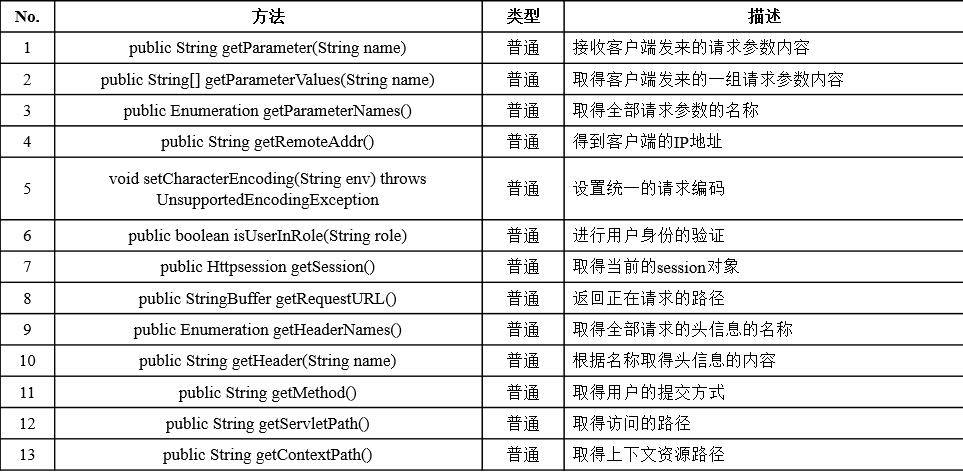
request内置对象常用方法:
乱码解决:
浏览器的默认编码为UTF-8,此时刻通过setCharacterEncoding()方法设置统计的编码即可;
eg: setCharacterEncoding("GBK");
接收请求参数:
单一的参数都是使用getParameter()接收(如文本框,单选按钮,密码框,隐藏框);
一组参数要使用getParameterValues()接收(复选框);
表单上的提交方式 get 和post:
get提交时,提交的内容会显示在地址栏之后;与地址重写的格式一样,信息长度有限制,一般在大小为4~5KB的数据;
post提交时,提交的内容不会显示在地址栏的后面;表单中有一些大文本或图片数据时,则只能使用post方式提交;
getParameterNames()
此方法返回所有请求参数的名称,返回值类型为Enumeration;
此接口实例需要使用hasMoreElements()方法判断是否有内容及使用nextElement()方法取出内容;
request_demo03.html:多种类型的表单页面,数据提交至request_demo03.jsp;
<html>
<head><title>显示多种类型的表单页面</title></head>
<body>
<form action="request_demo03.jsp" method="post">
    姓名:    <input type="text" name="uname"><br>
    性别:    <input type="radio" name="sex" value="男" CHECKED>男
            <input type="radio" name="sex" value="女">女<br>
    城市:    <select name="city">
                <option value="北京">北京</option>
                <option value="天津">天津</option>
                <option value="洛阳">洛阳</option>
            </select><br>
    兴趣:    <input type="checkbox" name="**inst" value="唱歌">唱歌
             <input type="checkbox" name="**inst" value="跳舞">跳舞
             <input type="checkbox" name="**inst" value="游泳">游泳
             <input type="checkbox" name="**inst" value="看书">看书
             <input type="checkbox" name="**inst" value="旅游">旅游<br>
    自我介绍:<textarea cols="30" rows="3" name="note"></textarea><br>
    <input type="hidden" name="uid" value="1">
    <input type="submit" value="提交">
    <input type="reset" value="重置">
</form>
</body>
</html>
request_demo03.jsp
<%@ page contentType="text/html" pageEncoding="GBK"%>
<%@ page import="java.util.*"%>
<html>
<head><title>接收参数信息界面</title></head>
<body>
<%
    request.setCharacterEncoding("GBK") ;// 设置的是统一编码
    Enumeration enu = request.getParameterNames() ;
%>
<table border="1">
    <tr>
        <td>参数名称</td>
        <td>参数内容</td>
    </tr>
<%
    while(enu.hasMoreElements()){
        String paramName = (String) enu.nextElement() ;
%>
        <tr>
            <td><%=paramName%></td>
            <td>
<%
            if(paramName.startsWith("**")){        // 是以**开头
                String paramValue[] = request.getParameterValues(paramName) ;
                for(int x=0;x<paramValue.length;x++){
%>
                    <%=paramValue[x]%>、
<%
                }
            } else {
                String paramValue = request.getParameter(paramName) ;
%>
                <%=paramValue%>
<%
            }
%>
            </td>
        </tr>
<%
    }
%>
</table>
</body>
</html>
显示全部的头信息
请求和响应的同时也包含一些其它的信息(如客户端的IP,Cookie,语言等),这些额外的信息就是头信息;
request内置对象的getHeaderNames()方法取得头信息的名称;
getHeader()方法取出每一个头信息的内容;
request_demo04.jsp:取出头信息的名称及内容
<%@ page contentType="text/html" pageEncoding="GBK"%>
<%@ page import="java.util.*"%>
<html>
<head><title>取出头信息的名称及内容</title></head>
<body>
<%
    Enumeration enu = request.getHeaderNames() ;    // 取得全部的头信息
    while(enu.hasMoreElements()){
        String headerName = (String) enu.nextElement() ;
        String headerValue = request.getHeader(headerName) ;
%>
        <h5><%=headerName%> --> <%=headerValue%></h5>
<%
    }
%>
</table>
</body>
</html>
其它操作
request取得客户端的IP地址,访问的路径信息,提交的方式;
request_demo05.jsp
<%@ page contentType="text/html" pageEncoding="GBK"%>
<%@ page import="java.util.*"%>
<html>
<head><title>request取得其它信息</title></head>
<body>
<%
    String method = request.getMethod() ;
    String ip = request.getRemoteAddr() ;
    String path = request.getServletPath() ;
    String contextPath = request.getContextPath() ;
%>
<h3>请求方式:<%=method%></h3>
<h3>IP地址:<%=ip%></h3>
<h3>访问路径:<%=path%></h3>
<h3>上下文名称:<%=contextPath%></h3>
</table>
</body>
</html>
当服务器端需要到请求客户端的相关信息时就会使用request对象来完成;
2.2 response对象
作用:对客户端的请求进行回应,将Web服务器处理后的结果发回给客户端;
response对象属于javax.servlet.http.HttpServletResponse接口的实例;
接口定义:public interface HttpServletResponse extends ServletResponse;
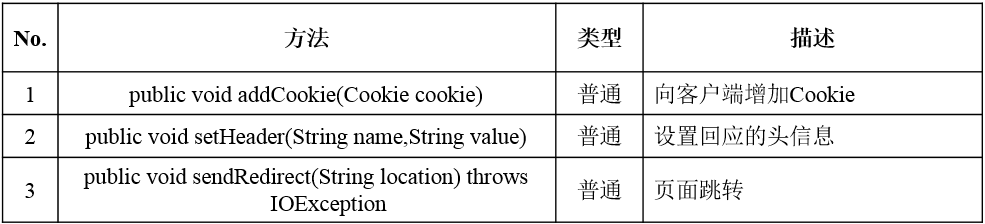
response常用方法:
设置头信息
response_demo01,jsp
<%@ page contentType="text/html" pageEncoding="GBK"%>
<html>
<head><title>设置定时刷新的头信息</title></head>
<body>
<%!    // 定义全局变量
    int count = 0 ;
%>
<%
    response.setHeader("refresh","2") ;    // 页面2秒一刷新
%>
<h3>已经访问了<%=count++%>次!</h3>
</body>
</html>
response_demo02.jsp:3秒后跳转至其它页面
<%@ page contentType="text/html" pageEncoding="GBK"%>
<html>
<head><title>3秒后跳转其它页面</title></head>
<body>
<h3>3秒后跳转到hello.htm页面,如果没有跳转请按<a href="hello.htm">这里</a>!</h3>
<%
    response.setHeader("refresh","3;URL=hello.htm") ;    // 3秒后跳转到hello.htm页面;定时的时间为0则立即发生跳转;
%>
</body>
</html>
定时跳转属于客户端跳转;
response_demo02.jsp设置的跳转指令等同于以下的HTML代码:
<html>
<head><title>HTML代码跳转</title></head>
<META HTTP-EQUIV="refresh" CONTENT="3;URL=hello.htm">
<body>
<h3>3秒后跳转到hello.htm页面,如果没有跳转请按<a href="hello.htm">这里</a>!</h3>
</body>
</html>
只有当一个页面中没有jsp代码而又想执行定时跳转是才使用以上代码;
页面跳转
除了采取头信息的方式完成跳转外,也可以使用response对象的sendRedirect()方法直接完成跳转;
response.sendRedirect()跳转属于客户端跳转;<jsp:forward />属于客户端跳转;
客户端跳转和服务端跳转特点:
使用request属性范围时,只有服务器跳转才能将request范围的属性保存到跳转页;
使用服务端跳转,则执行到跳转语句时会立刻进行跳转;
如果是客户端跳转,则无法进行request属性的传递;
如果是客户端跳转,则是在整个页面执行完自后才执行跳转;
使用JDBC操作是,一定要在<jsp:forward />语句执行之前关闭数据库的连接,否则将无法关闭;
操作Cookie
Cookie是浏览器提供的一种技术;
该技术让服务器端的程序能将一些只需保存在客户端或者在客户端进行处理的数据,放在本地使用的计算机中,不须通过网络的传输;
提高了网页处理的效率,而且减少了服务器端的负载;
由于Cookie是服务器端保存客户端的信息,所以其安全性是很差的;
jsp提供了javax.servlet.http.Cookie操作类;
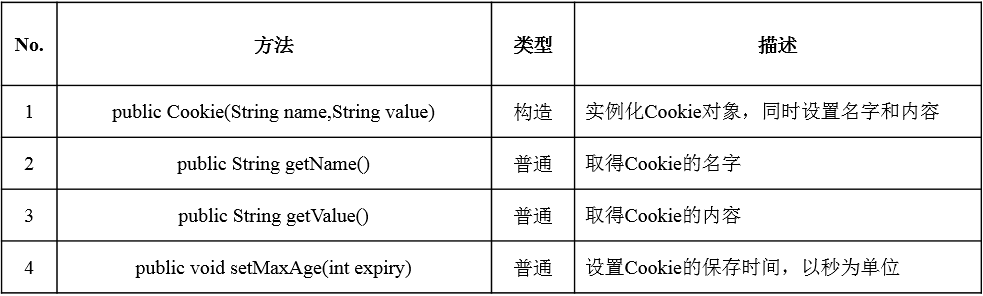
Cookie定义的常用方法:
所有的Cookie是由服务器端设置到客户端去的,所以向客户端增加Cookie,必须使用response对象的一下方法:
pubic void addCookie(Cookie cookie);
response_deme03.jsp:向客户端增加Cookie
<%@ page contentType="text/html" pageEncoding="GBK"%>
<html>
<head><title>向客户端增加Cookie</title></head>
<body>
<%
    Cookie c1 = new Cookie("bs","bugshi") ;//定义新的Cookie
    Cookie c2 = new Cookie("hd","www.baidu.com") ;
    c1.setMaxAge(100) ;//设置Cookie的保存时间
    c2.setMaxAge(100) ;
    response.addCookie(c1) ;//向客户端增加Cookie
    response.addCookie(c2) ;
%>
</body>
</html>
如果要取得客户端设值得Cookie,可以通过resquest对象完成:pubic Cookie getCookies();
response_demo07.jsp : 取得客户端的Cookie
<%@ page contentType="text/html" pageEncoding="GBK"%>
<html>
<head><title>取得客户端的Cookie</title></head>
<body>
<%
    Cookie c[] = request.getCookies() ;    // 取得客户端的全部Cookie
    System.out.println(c) ;
    for(int x=0;x<c.length;x++){
%>
        <h3><%=c[x].getName()%> --> <%=c[x].getValue()%></h3>
<%
    }
%>
</body>
</html>
在每一个客户端访问服务器时,服务器为了明确区分每一个客户端,都会自动设置一个JSESSIONID的Cookie,表示用户的唯一身份标识;
设置Cookie的保存时间,是为了真正将Cookie把存在客户端上;使用Cookie类提供的setMaxAge()方法即可;
Cookie可以保存信息,但不能无限制的保存,一般一个客户端可以保存300个Cookie,所以数据太大无法保存Cookie;
2.3 session对象
session对象最常用的用处就是完成用的登录、注销等常见功能;
每一个对象表示不同的访问用户;
session对象是javax.servlet.http.HttpSession接口的实例化对象;
session只能应用在http协议中;
HttpSession接口的常用方法如下:
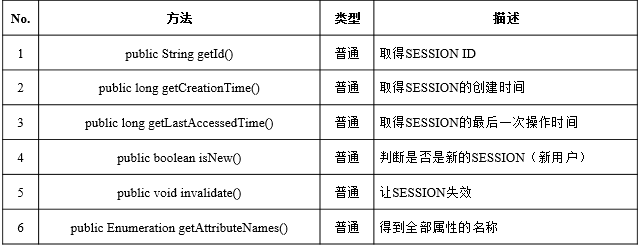
取得session id
当用户连接到服务器后,服务器会自动为此session分配一个不会重复的Session Id;
服务器依据此Session Id来区分每一个不同的用户;
使用HttpSession接口中的getId()方法取的唯一标识:
<%>
        String id=session.getId();//取得Session ID
<%>
Session使用Cookie的机制;
对于每一个连接到服务器的用户,如果重启服务器,则这些用户再次发送请求表示的都是一个新连接的用户;服务器会重新分配一个新的Session Id;
可以通过序列化的方式保存session,即使重启服务器后,这些session依旧可以使用;
登录及注销
当用户的登录成功后,设置一个session范围的属性,然后在其它需要验证的页面判断是否存在此session范围的属性;
如果存在,表示是正常合法的用户;
如果不存在,则给出提示,并跳转回登录页提示用户重新登录;
用户登录后可进行注销操作;
login.jsp
完成登录表单的显示,同时向页面本身提交数据,以完成登录的验证;
登录成功,保存属性;登录失败,显示登录失败的信息;
<%@ page contentType="text/html" pageEncoding="GBK"%> <html> <head><title>编写表单并执行验证</title></head> <body> <form action="login.jsp" method="post"> 用户名:<input type="text" name="uname"><br> 密 码:<input type="password" name="upass"><br> <input type="submit" value="登陆"> <input type="reset" value="重置"> </form> <% // 直接通过一个固定的用户名和密码 String name = request.getParameter("uname") ; String password = request.getParameter("upass") ; if(!(name==null || "".equals(name) || password==null || "".equals(password))){ if("bugshi".equals(name) && "123456".equals(password)){ // 如果登陆成功,则设置session属性范围。 session.setAttribute("userid",name) ; response.setHeader("refresh","2;URL=welcome.jsp") ; %> <h3>用户登陆成功,两秒后跳转到欢迎页!</h3> <h3>如果没有跳转,请按<a href="welcome.jsp">这里</a>!</h3> <% } else { %> <h3>错误的用户名或密码!</h3> <% } } %> </body> </html>
login.jsp使用自身提交的方式,所以必须进行是否为空的验证;
如果全部验证通过,则设置用户名保存session属性范围中,并跳转到welcome.jsp页面显示欢迎信息;
welcome.jsp:
<%@ page contentType="text/html" pageEncoding="GBK"%>
<html>
<head><title>欢迎页</title></head>
<body>
<%    // 如果已经设置过了session属性,则肯定不为空
    if(session.getAttribute("userid")!=null){
%>
        <h3>欢迎<%=session.getAttribute("userid")%>光临本系统,<a href="logout.jsp">注销</a></h3>
<%
    } else {    // 没有session,则应该给出提示,先去登陆
%>
        <h3>请先进行系统的<a href="login.jsp">登陆</a>!</h3>
<%
    }
%>
</body>
</html>
welcome.jsp页面对session属性范围是否存在进行了判断,如果存在则是已经登录过得合法用户;
logout.jsp :
<%@ page contentType="text/html" pageEncoding="GBK"%>
<html>
<head><title>注销页面</title></head>
<body>
<%
    response.setHeader("refresh","2;URL=login.jsp") ;
    session.invalidate() ;    // 注销,表示当前的session失效
%>
<h3>您已成功退出本系统,两秒后跳转回首页!</h3>
<h3>如果没有跳转,请按<a href="login.jsp">这里</a>!</h3>
</body>
</html>
logout.jsp使用了invalidate()方法进行了session的注销操作;
使用该方法,将在服务器是上销毁此session的全部信息,同时设置了2秒后定时跳转的功能;
也可以使用会话跟踪技术完成此类登录操作;
web开发中,一共存在4种会话跟踪技术:
1 通过session提供的方法保存;
2 使用Cookie保存信息;
3 使用表单的隐藏域保存信息;
4 通过地址重写的方式保存信息;
判断新用户
session中使用isNew()方法(通过Cookie方式)判断一个用户是否是第一次访问页面;
is_new.jsp
<%@ page contentType="text/html" pageEncoding="GBK"%>
<html>
<head><title>判断是是否是老用户</title></head>
<body>
<%
    if(session.isNew()){
%>
        <h3>欢迎新用户光临!</h3>
<%
    } else {
%>
        <h3>您已经是老用户了!</h3>
<%
    }
%>
</body>
</html>
取得用户的操作时间
session对象中,可以通过getCreationTime()方法取得一个session的创建时间;
通过getLastAccessedTime()方法取得一个session的最后一次操作时间;
get_time.jsp
<%@ page contentType="text/html" pageEncoding="GBK"%>
<html>
<head><title>取得一个session的操作时间</title></head>
<body>
<%
    long start = session.getCreationTime() ;
    long end = session.getLastAccessedTime() ;
    long time = (end - start) / 1000 ;
%>
<h3>您已经停留了<%=time%>秒!</h3>
</body>
</html>
当用户第一次连接到服务器上时,服务器就会自动保留一个session的创建时间;
2.4 application对象
application对象是javax.servlet.ServletContext接口的实例化对象;
表示整个的servlet上下文;ServletContext代表整个容器的操作;
常用方法:
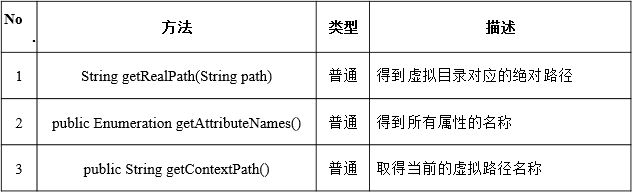
取得虚拟目录对应的绝对路径:
<%
    String path = application.getRealPath("/") ;
%>
注:对于application对象,web中可以用getServletContext()方法进行替代;
上面可更改为: String path=this.getServletContext().getRealPath("/");
此处的方法表示的是由容器进行调用,实际上ServletContext本身就表示整个容器;
尽量使用this.getServletContext()来替代application对象;
通过取得绝对路径,完成简单的文件操作:
要求:使用表单输入要保存的文件名称及内容,然后直接在web项目的根目录中的note文件夹中保存文件;
input_content.html :输入文件名称及内容
<html>
<head><title>输入文件名称及内容</title></head>
<body>
<form action="input_content.jsp" method="post">
    输入文件名称:<input type="text" name="filename"><br>
    输入文件内容:<textarea name="filecontent" cols="30" rows="3"></textarea><br>
    <input type="submit" value="保存">
    <input type="reset" value="重置">
</form>
</body>
</html>
input_content.jsp : 接收内容并保存文件及内容
<%@ page contentType="text/html" pageEncoding="GBK"%>
<%@ page import="java.io.*"%>
<%@ page import="java.util.*"%>
<html>
<head><title>接收内容并保存文件及内容</title></head>
<body>
<%
    request.setCharacterEncoding("GBK") ;    // 解决乱码问题
    String name = request.getParameter("filename") ;
    String content = request.getParameter("filecontent") ;
    // 要想操作文件必须有绝对路径,那么这个时候使用getRealPath()
    String fileName = this.getServletContext().getRealPath("/") + "note" + File.separator + name ;    // 保存在note文件夹之中
    File file = new File(fileName) ;    // 实例化File类对象
    if(!file.getParentFile().exists()){
        file.getParentFile().mkdir() ;    // 建立一个文件夹
    }
    PrintStream ps = null ;
    ps = new PrintStream(new FileOutputStream(file)) ;
    ps.println(content) ;
    ps.close() ;
%>
<%
    Scanner scan = new Scanner(new FileInputStream(file)) ;
    scan.useDelimiter("\n") ;
    StringBuffer buf = new StringBuffer() ;
    while(scan.hasNext()){
        buf.append(scan.next()).append("<br>") ;
    }
    scan.close() ;
%>
<%=buf%>
</body>
</html>
范例:网站计数器
1 网站来往的人数可能会很多,有可能超过20位数,只靠基本数据类型难以保存,必须使用大整数类——BigInteger;
2 用户每次在第一次访问才需要进行计数的操作,重复刷新页面则不应重复计数,执行计算之前必须使用isNew()判断用户是否是第一次访问;
3 web开发属于多线程操作,所以进行更改、保存时需要进行同步操作;
count.jsp
<%@ page contentType="text/html" pageEncoding="GBK"%>
<%@ page import="java.io.*"%>
<%@ page import="java.util.*"%>
<%@ page import="java.math.*"%>
<html>
<head><title>计数器</title></head>
<body>
<%!
    BigInteger count = null ;
%>
<%!    // 为了开发简便,将所有的操作定义在方法之中,所有的异常直接加入完整的try...catch处理
    public BigInteger load(File file){
        BigInteger count = null ;    // 接收数据
        try{
            if(file.exists()){
                Scanner scan = new Scanner(new FileInputStream(file)) ;
                if(scan.hasNext()){
                    count = new BigInteger(scan.next()) ;
                }
                scan.close() ;
            } else {    // 应该保存一个新的,从0开始
                count = new BigInteger("0") ;
                save(file,count) ;    // 保存一个新的文件
            }
        }catch(Exception e){
            e.printStackTrace() ;
        }
        return count ;
    }
    public void save(File file,BigInteger count){
        try{
            PrintStream ps = null ;
            ps = new PrintStream(new FileOutputStream(file)) ;
            ps.println(count) ;
            ps.close() ;
        }catch(Exception e){
            e.printStackTrace() ;
        }
    }
%>
<%
    String fileName = this.getServletContext().getRealPath("/") + "count.txt";    // 这里面保存所有的计数的结果
    File file = new File(fileName) ;
    if(session.isNew()){
        synchronized(this){
            count = load(file) ;    // 读取
            count = count.add(new BigInteger("1")) ;    // 再原本的基础上增加1。
            save(file,count) ;
        }
    }
%>
<h2>您是第<%=count==null?0:count%>位访客!</h2>
</body>
</html>
查看application范围的属性
application对象提供了getAttributeNames()方法,可以取得全部属性的名称;
all_attribute.jsp
<%@ page contentType="text/html" pageEncoding="GBK"%>
<%@ page import="java.util.*"%>
<html>
<head><title>列出全部的属性名称及内容</title></head>
<body>
<%
    Enumeration enu = this.getServletContext().getAttributeNames() ;    // 取得全部的属性
    while(enu.hasMoreElements()){
        String name = (String) enu.nextElement() ;
%>
        <h4><%=name%> --> <%=this.getServletContext().getAttribute(name)%></h4>
<%
    }
%>
</body>
</html>
2.5 Web安全性及config对象
Web安全性
Web目录中必须存在一个WEB-INF文件,此目录无法被外部所看见,其安全性很高;
保存在此目录中的程序安全性也很高;
定义WEB-INF目录时,字母必须是大写;
定义一个hello.jsp文件,此文件保存在WEB-INF目录中;
hello.jsp
<html>
<head>
    <title>WEB-INF目录下的jsp文件</title>
</head>
<body>
    <%
        out.println("<h1>Hello World!!!</h1>") ;
    %>
</body>
</html>
以上文件受到保护,外部永远无法访问,所以此时需要通过一个映射来进行操作;
增加配置——>修改/WEB-INF/web.xml
<?xml version="1.0" encoding="ISO-8859-1"?>
<web-app xmlns="http://java.sun.com/xml/ns/javaee"
   xmlns:xsi="http://www.w3.org/2001/XMLSchema-instance"
   xsi:schemaLocation="http://java.sun.com/xml/ns/javaee http://java.sun.com/xml/ns/javaee/web-app_2_5.xsd"
   version="2.5">
  <servlet>
        <servlet-name>he</servlet-name>
        <jsp-file>/WEB-INF/hello.jsp</jsp-file>
    </servlet>
    <servlet-mapping>
           <servlet-name>he</servlet-name>
            <url-pattern>/hello</url-pattern>
    </servlet-mapping>
</web-app>
将/WEB-INF/hello.jsp的文件映射成为一个"/hello"的访问路径;
只需要输入“/hello”,就会自动根据<servlet-mapping>节点中配置的<servlet-name>找到<servlet>节点,并找到其中的<jsp-file>所指定的真实文件路径执行程序;
<servlet-name>节点是连接<servlet>和<servlet-mapping>节点,此节点的名称只在配置文件中起作用,并且多个配置不能才重名;
web.xml修改之后要重新启动Tomcat;
config对象
config对象时javax.servlet.ServletConfig接口的实例化对象;
功能是取得一些初始化的配置信息;
ServletConfig接口的常用方法:
public String getInitParameter(String name) 取得指定名称的初始化参数内容;
public Enumeration getInitParameterNames() 取得全部的初始化参数名称;
所有的初始化参数必须在web.xml文件中配置,即:如果一个jsp文件要想通过初始化参数取得一些信息,则一定要在web.xml文件中完成映射;
init.jsp
<%@ page contentType="text/html" pageEncoding="GBK"%>
<html>
<head><title>读取初始化参数</title></head>
<body>
<%
    String dbDriver = config.getInitParameter("driver") ;
    String dbUrl = config.getInitParameter("url") ;
%>
<h3>驱动程序:<%=dbDriver%></h3>
<h3>连接地址:<%=dbUrl%></h3>
</body>
</html>
init.jsp文件要读取driver和url两个配置的初始化参数,这两个参数一定要在web.xml中配置;
<web-app xmlns="http://java.sun.com/xml/ns/javaee"
   xmlns:xsi="http://www.w3.org/2001/XMLSchema-instance"
   xsi:schemaLocation="http://java.sun.com/xml/ns/javaee http://java.sun.com/xml/ns/javaee/web-app_2_5.xsd"
   version="2.5">
  <servlet>
    <servlet-name>dbinit</servlet-name>
    <jsp-file>/WEB-INF/init.jsp</jsp-file>
    <init-param>
        <param-name>driver</param-name>
        <param-value>org.gjt.mm.mysql.Driver</param-value>
    </init-param>
    <init-param>
        <param-name>url</param-name>
        <param-value>jdbc:mysql://localhost:3306/bugshi</param-value>
    </init-param>
  </servlet>
  <servlet-mapping>
    <servlet-name>dbinit</servlet-name>
    <url-pattern>/config</url-pattern>
  </servlet-mapping>
</web-app>
必须通过映射路径才能取得初始化参数;
2.6 out对象
out对象是javax.servlet.jsp.JspWriter类的实例化对象;
功能是完成页面的输出操作;但使用out对象输出的几率很小,一般使用表达式输出;
out对象的其它操作:
public int getBufferSize(); 返回JSP中缓冲区的大小;
public int getRemaining(); 返回JSP中未使用的缓冲区大小;
out_demo01.jsp:
<%@ page contentType="text/html" pageEncoding="GBK"%>
<html>
<head><title>取得输出的缓冲区大小</title></head>
<body>
<%
    int buffer = out.getBufferSize() ;
    int avaliable = out.getRemaining() ;
    int use = buffer - avaliable ;
%>
<h3>缓冲区大小:<%=buffer%></h3>
<h3>可用的缓冲区大小:<%=avaliable%></h3>
<h3>使用中的缓冲区大小:<%=use%></h3>
</body>
</html>
2.7 pageContext对象
pageContext对象是javax.servlet.jsp.pageContext类的实例;
表示一个jsp页面的上下文;
pageContext对象的方法:
public abstract void forward(String relativeUrlPath)throw ServletException ,IOException 页面跳转;
public void include(String relativeUrlPath) throw ServletException,IOException 页面包含;
public ServletConfig getServletConfig() 取得ServletConfig对象;
public ServletConfig getServletContext() 取得ServletContext对象;
public ServletRequest getRequest() 取得ServletRequest对象;
public ServletResponse getResponse() 取得ServletResponse对象;
public HttpSession getSession() 取得HttpSession对象;
之前的request,response,config,application,<jsp:include />,<jsp:forward />等操作实际上都可以在pageContext对象中完成;
pagecontext_forward_demo01.jsp
<%@ page contentType="text/html" pageEncoding="GBK"%>
<html>
<head><title>跳转前的页面</title></head>
<body>
<%
    pageContext.forward("pagecontext_forward_demo02.jsp?info=bugshi") ;
%>
</body>
</html>
以上使用pageContext对象中的forward()方法完成跳转,通过地址重写的方式传递一个参数到pagecontext_forward_demo02.jsp页面上;
pagecontext_forward_demo02.jsp
<%@ page contentType="text/html" pageEncoding="GBK"%>
<html>
<head><title>跳转后的页面</title></head>
<body>
<%
    // 直接从pageContext对象中取得了request
    String info = pageContext.getRequest().getParameter("info") ;
%>
<h3>info = <%=info%></h3>
<h3>realpath = <%=pageContext.getServletContext().getRealPath("/")%></h3>
</body>
</html>
取得的操作实际上是request和response对象所在接口的父接口实例;
pageContext对象中getRequest()和getResponse()两个方法返回的是ServletRequest和ServletResponse;
常用的request和response分别是HttpServletRequest和HttpServletResponse接口的实例;