第三部分
Introduction
In this tutorial, we are going to dive deep into two fundamental concepts: URLs and Forms. In the process, we are going to explore many other concepts like creating reusable templates and installing third-party libraries. We are also going to write plenty of unit tests.
3.1.urls and views
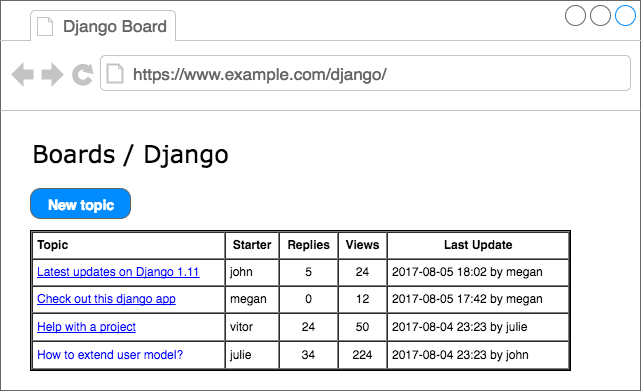
Proceeding with the development of our application, now we have to implement a new page to list all the topics that belong to a given Board. Just to recap, below you can see the wireframe we drew in the previous tutorial:
We will start by editing the urls.py inside the myproject folder:
myproject/urls.py
# mysite/urls.py

from django.conf.urls import url
from django.contrib import admin

from boards import views


urlpatterns = [
    url(r'^admin/', admin.site.urls),
    url(r'^$', views.home,name='home'),
    url(r'^boards/(?P<pk>\d+)$', views.board_topics,name='board_topics'),
]


This time let’s take a moment and analyze the urlpatterns and url.

The URL dispatcher and URLconf (URL configuration) are fundamental parts of a Django application. In the beginning, it can look confusing; I remember having a hard time when I first started developing with Django.

In fact, right now the Django Developers are working on a proposal to make simplified routing syntax. But for now, as per the version 1.11, that’s what we have. So let’s try to understand how it works.

A project can have many urls.py distributed among the apps. But Django needs a url.py to use as a starting point. This special urls.py is called root URLconf. It’s defined in the settings.py file.

myproject/settings.py
      ROOT_URLCONF = 'myproject.urls'

it already comes configured, so you don’t need to change anything here.

When Django receives a request, it starts searching for a match in the project’s URLconf. It starts with the first entry of the urlpatterns variable, and test the requested URL against each url entry.

If Django finds a match, it will pass the request to the view function, which is the second parameter of the url. The order in the urlpatterns matters, because Django will stop searching as soon as it finds a match. Now, if Django doesn’t find a match in the URLconf, it will raise a 404 exception, which is the error code for Page Not Found.

This is the anatomy of the url function:

   def url(regex, view, kwargs=None, name=None):
    # ...

regex: A regular expression for matching URL patterns in strings. Note that these regular expressions do not search GET or POST parameters. In a request to http://127.0.0.1:8000/boards/?page=2 only /boards/ will be processed.
view: A view function used to process the user request for a matched URL. It also accepts the return of the django.conf.urls.include function, which is used to reference an external urls.py file. You can, for example, use it to define a set of app specific URLs, and include it in the root URLconf using a prefix. We will explore more on this concept later on.
kwargs: Arbitrary keyword arguments that’s passed to the target view. It is normally used to do some simple customization on reusable views. We don’t use it very often.
name: A unique identifier for a given URL. This is a very important feature. Always remember to name your URLs. With this, you can change a specific URL in the whole project by just changing the regex. So it’s important to never hard code URLs in the views or templates, and always refer to the URLs by its name.
Now let’s create the view function board_topics:
boards/views.py
from django.shortcuts import render,get_object_or_404

def board_topics(request,pk):
    board = get_object_or_404(Board,pk=pk)
    return render(request,'topics.html',{'board':board})
新建topics.html,代码如下:
{#templates/topics.html#}

{% load static %}

<!DOCTYPE html>
<html lang="en">
<head>
    <meta charset="UTF-8">
    <title>{{ board.name }}</title>
    <link rel="stylesheet" href="{% static 'css/bootstrap.min.css' %}">
</head>
<body>
    <div class="container">
        <ol class="breadcrumb my-4">
            <li class="breadcrumb-item">Boards</li>
            <li class="breadcrumb-item active">{{ board.name }}</li>
        </ol>
    </div>

</body>
</html>
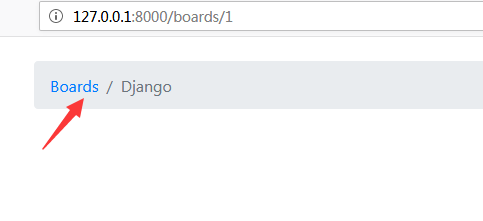
访问看看

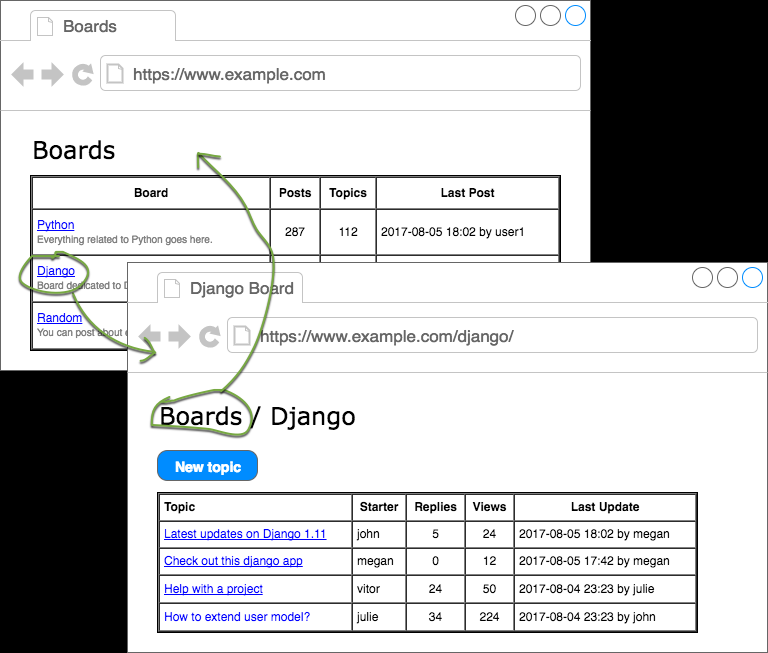
Te next step now is to create the navigation links in the screens. The homepage should have a link to take the visitor to the topics page of a given Board. Similarly, the topics page should have a link back to the homepage.
3.2.完善home 和topics页面
Edit the home.html template:
templates/home.html
 <td>
   <a href="{% url 'board_topics' board.pk %}">{{ board.name }}</a>
   <small class="text-muted d-block">{{ board.description }}
</td>
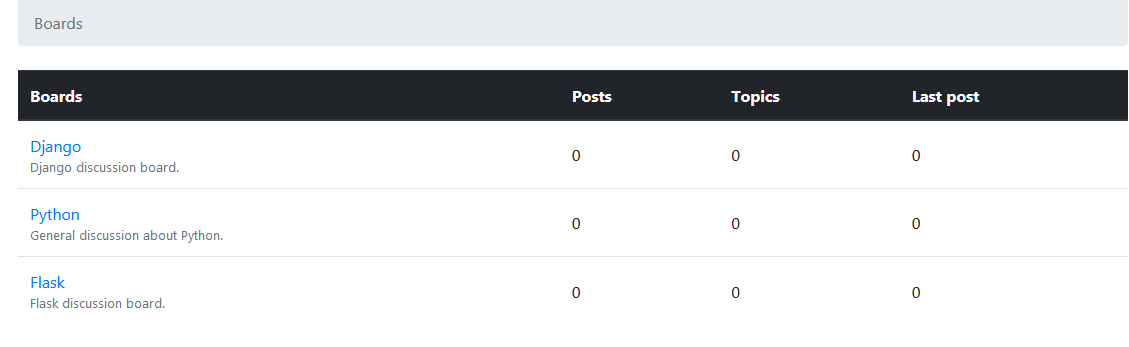
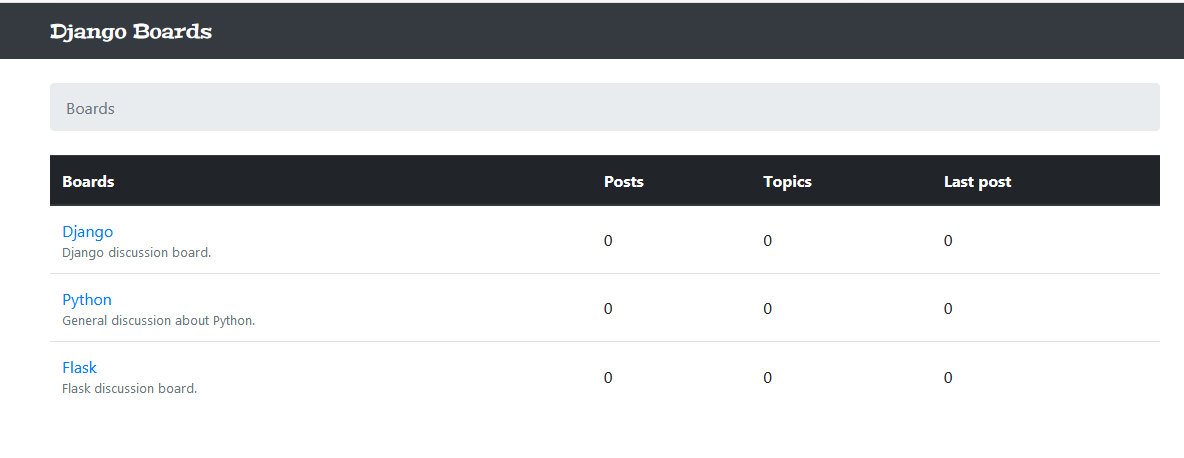
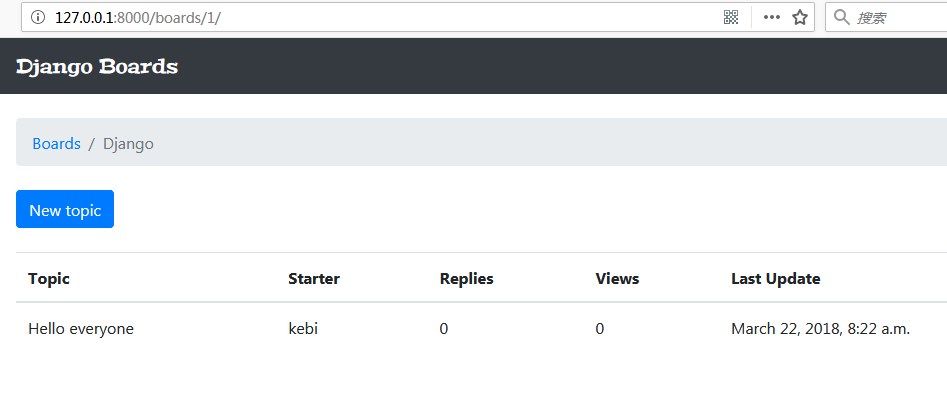
Now we can check how it looks in the web browser:
Update the board topics template:
templates/topics.html
 <ol class="breadcrumb my-4">
     <li class="breadcrumb-item"><a href="{% url 'home' %}">Boards</a></li>
     <li class="breadcrumb-item active">{{ board.name }}</li>
 </ol>
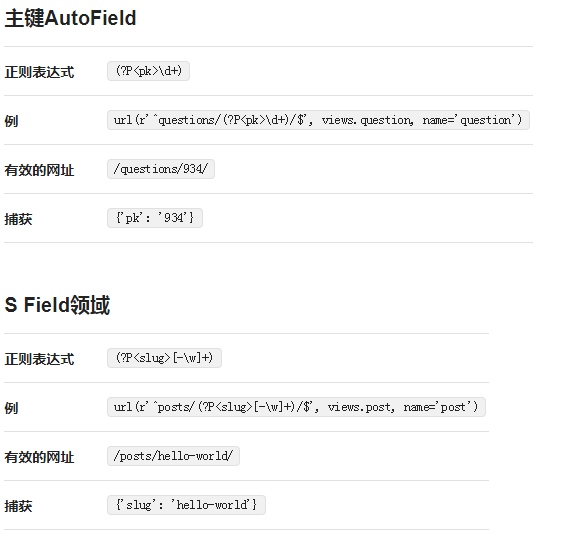
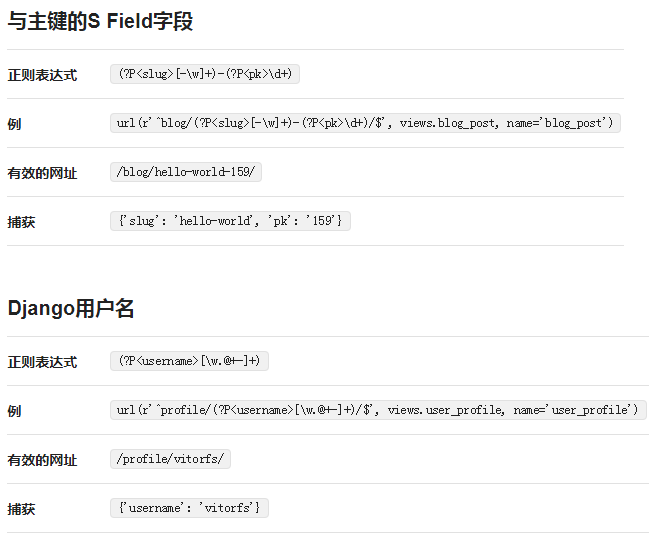
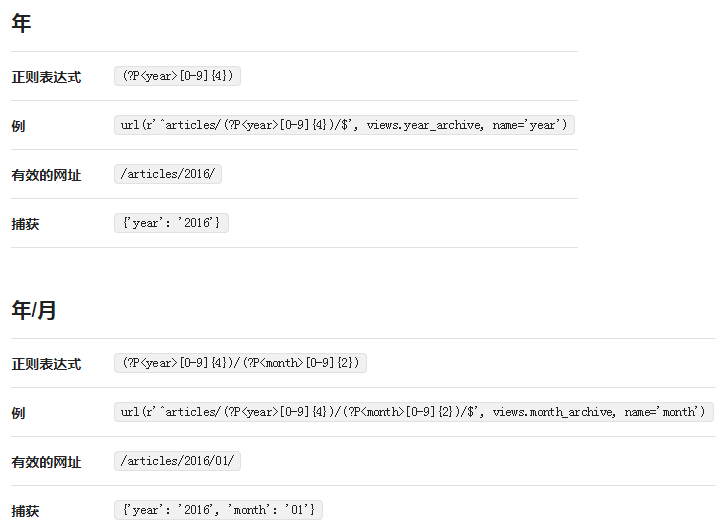
3.3.List of Useful URL Patterns
最常用的URL模式列表。
3.4.创建母板
In this section we are going to refactor our HTML templates, creating a master page and only adding the unique part for each template.
Create a new file named base.html in the templates folder:
templates/base.htm
{#templates/base.html#}

{% load static %}

<!DOCTYPE html>
<html lang="en">
<head>
    <meta charset="UTF-8">
    <title>{% block title %}Django Boards{% endblock %}</title>
    <link rel="stylesheet" href="{% static 'css/bootstrap.min.css' %}">
</head>
<body>
    <div class="container">
        <ol class="breadcrumb my-4">
            {% block breadcrumb %}

            {% endblock %}
        </ol>
        {% block content %}
        {% endblock %}
    </div>
</body>
</html>
templates/home.html
{#templates/home.html#}

{% extends 'base.html' %}

{% block breadcrumb %}
    <li class="breadcrumb-item active">Boards</li>
{% endblock %}

{% block content %}


<table class="table">
    <thead class="thead-dark">
    <tr>
        <th>Boards</th>
        <th>Posts</th>
        <th>Topics</th>
        <th>Last post</th>
    </tr>

    </thead>

    <tbody>
    {% for board in boards %}
        <tr>
            <td>
                <a href="{% url 'board_topics' board.pk %}">{{ board.name }}</a>
                <small class="text-muted d-block">{{ board.description }}
            </td>
            <td class="align-middle">0</td>
            <td class="align-middle">0</td>
            <td class="align-middle">0</td>
        </tr>
    {% endfor %}
    </tbody>
</table>
{% endblock %}
templates/topics.html
{#templates/topics.html#}

{% extends 'base.html' %}

{% block title %}{{ board.name }} - {{ block.super }}{% endblock %}

{% block breadcrumb %}
    <li class="breadcrumb-item"><a href="{% url 'home' %}">Boards</a></li>
    <li class="breadcrumb-item active">{{ board.name }}</li>
{% endblock %}

{% block content %}

{% endblock %}
In the topics.html template, we are changing the {% block title %} default value. Notice that we can reuse the default value of the block by calling {{ block.super }}. So here we are playing with the website title, which we defined in the base.html as “Django Boards.” So for the “Python” board page, the title will be “Python - Django Boards,” for the “Random” board the title will be “Random - Django Boards.”
Now that we have the base.html template, we can easily add a top bar with a menu:
添加顶部栏
templates/base.html
   <nav class="navbar navbar-expand-lg navbar-dark bg-dark">
        <div class="container">
            <a class="navbar-brand" href="{% url 'home' %}">Django</a>
        </div>
    </nav>


{#templates/base.html#}

{% load static %}

<!DOCTYPE html>
<html lang="en">
<head>
    <meta charset="UTF-8">
    <title>{% block title %}Django Boards{% endblock %}</title>
    <link rel="stylesheet" href="{% static 'css/bootstrap.min.css' %}">
</head>
<body>
    <nav class="navbar navbar-expand-lg navbar-dark bg-dark">
        <div class="container">
            <a class="navbar-brand" href="{% url 'home' %}">Django</a>
        </div>
    </nav>


    <div class="container">
        <ol class="breadcrumb my-4">
            {% block breadcrumb %}

            {% endblock %}
        </ol>
        {% block content %}
        {% endblock %}
    </div>
</body>
</html>
在base.html模板中添加字体:
<head>
    <meta charset="UTF-8">
    <title>{% block title %}Django Boards{% endblock %}</title>
    <link rel="stylesheet" href="{% static 'css/bootstrap.min.css' %}">
    <link href="https://fonts.googleapis.com/css?family=Peralta" rel="stylesheet">
    <link rel="stylesheet" href="{% static 'css/app.css' %}">
</head>
在static / css文件夹中创建一个名为app.css的新CSS文件:
static/css/app.css
.navbar-brand {
  font-family: 'Peralta', cursive;
}
修改templates/topics.html
{#templates/topics.html#}

{% extends 'base.html' %}

{% block title %}
    {{ board.name }} - {{ block.super }}
{% endblock %}

{% block breadcrumb %}
    <li class="breadcrumb-item"><a href="{% url 'home' %}">Boards</a></li>
    <li class="breadcrumb-item active">{{ board.name }}</li>
{% endblock %}

{% block content %}
    <div class="mb-4">
        <a href="{% url 'new_topic' board.pk %}" class="btn btn-primary">New topic</a>
    </div>
    <table class="table">
        <thead class="thead-inverse">
        <tr>
            <th>Topic</th>
            <th>Starter</th>
            <th>Replies</th>
            <th>Views</th>
            <th>Last Update</th>
        </tr>
        </thead>
        <tbody>
        {% for topic in board.topics.all %}
            <tr>
                <td>{{ topic.subject }}</td>
                <td>{{ topic.starter.username }}</td>
                <td>0</td>
                <td>0</td>
                <td>{{ topic.last_updated }}</td>
            </tr>
        {% endfor %}
        </tbody>
    </table>
{% endblock %}
刷新可以看到有个添加topic选项
3.5.Forms
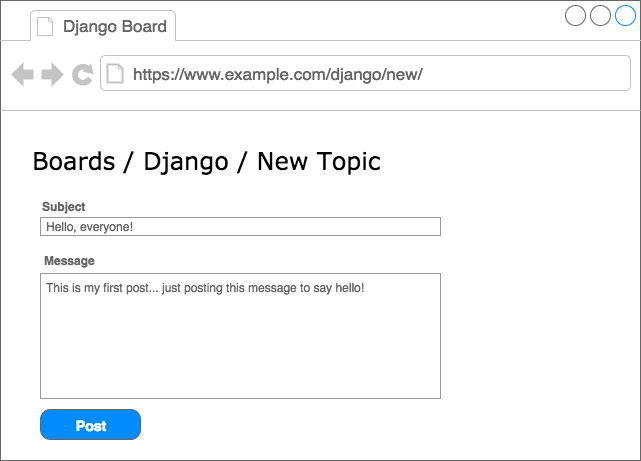
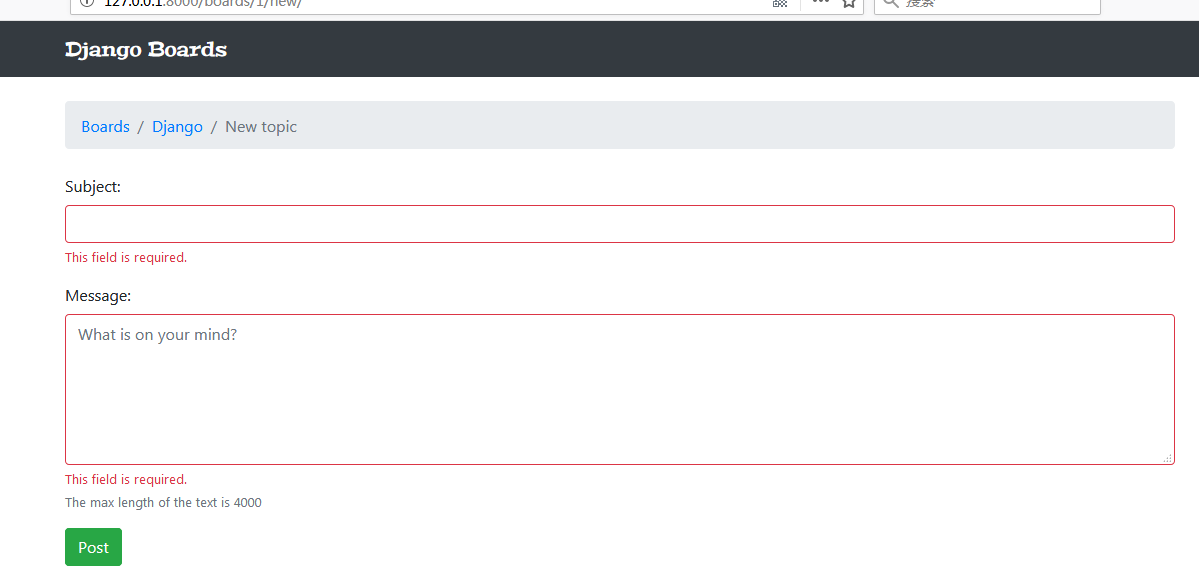
Anyway, let’s start by implementing the form below:
First thing, let’s create a new URL route named new_topic:
myproject/urls.py
urlpatterns = [
   url(r'^boards/(?P<pk>\d+)/new/$', views.new_topic,name='new_topic'),
]
Now let’s create the new_topic view function:
boards/views.py
def new_topic(request,pk):
    board = get_object_or_404(Board,pk=pk)
    return render(request,'new_topic.html',{'board':board})
Now we just need a template named new_topic.html to see some code working:
templates/new_topic.html
{#templates/new_topic.html#}

{% extends 'base.html' %}

{% block title %}Start a New Topic{% endblock %}


{% block breadcrumb %}
    <li class="breadcrumb-item"><a href="{% url 'home' %}">Board</a></li>
    <li class="breadcrumb-item"><a href="{% url 'board_topics' board.pk %}">{{ board.name }}</a></li>
    <li class="breadcrumb-item active">New Topic</li>
{% endblock %}

{% block content %}

{% endblock %}
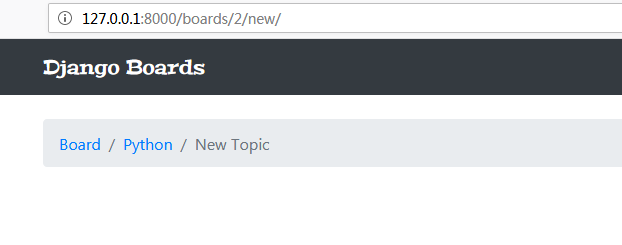
Open the URL http://127.0.0.1:8000/boards/2/new/. The result, for now, is the following page:
创建表单
Let’s create a new file named forms.py inside the boards’ folder:
boards/forms.py
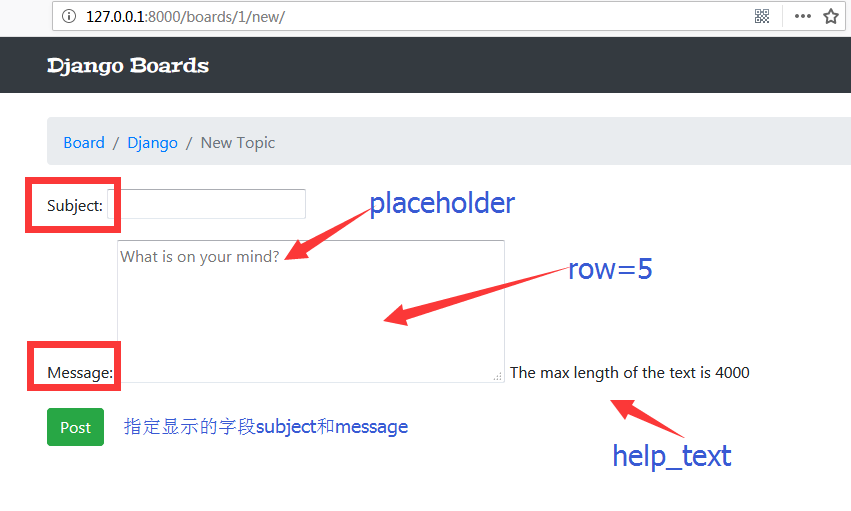
# boards/forms.py

from django import forms
from .models import Topic

class NewTopicForm(forms.ModelForm):
    message = forms.CharField(
        widget=forms.Textarea(attrs = {'row':5,'placeholder':'what is on your mind?'}),   #添加属性,行数和占位符
        max_length=4000,
        help_text='The max length of the text is 4000'       #帮助信息
    )

    class Meta:
        model = Topic
        fields = ['subject','message']             #显示的字段
views.py
#views.py

from django.shortcuts import render,get_object_or_404,redirect
from django.contrib.auth.models import User
from .models import Board,Topic,Post
from .forms import NewTopicForm


#主题
def new_topic(request,pk):
    board = get_object_or_404(Board,pk=pk)
    #获取当前登录的用户
    user = User.objects.first()
    if request.method == 'POST':
        #实例一个表单实例
        form = NewTopicForm(request.POST)
        if form.is_valid():
            topic = form.save(commit=False)
            topic.board = board
            topic.starter = user
            topic.save()
            post = Post.objects.create(
                message = form.cleaned_data.get('message'),
                topic = topic,
                created_by = user
            )
            return redirect('board_topics',pk=board.pk)     #重定向到已创建的主题页

    else:
        form = NewTopicForm()
    return render(request,'new_topic.html',{'board':board,'form':form})
模板/ new_topic.html
{#templates/new_topic.html#}

{% extends 'base.html' %}

{% block title %}Start a New Topic{% endblock %}


{% block breadcrumb %}
    <li class="breadcrumb-item"><a href="{% url 'home' %}">Board</a></li>
    <li class="breadcrumb-item"><a href="{% url 'board_topics' board.pk %}">{{ board.name }}</a></li>
    <li class="breadcrumb-item active">New Topic</li>
{% endblock %}

{% block content %}
    <form method="post">
    {% csrf_token %}
    {{ form.as_p }}
    <button type="submit" class="btn btn-success">Post</button>
    </form>
{% endblock %}
访问地址:http://127.0.0.1:8000/boards/1/new/
用Bootstrap 渲染表单
When working with Bootstrap or any other Front-End library, I like to use a Django package calleddjango-widget-tweaks. It gives us more control over the rendering process, keeping the defaults and just adding extra customizations on top of it.
Let’s start off by installing it:
pip install django-widget-tweaks
添加到apps里面
INSTALLED_APPS = [
    'django.contrib.admin',
    'django.contrib.auth',
    'django.contrib.contenttypes',
    'django.contrib.sessions',
    'django.contrib.messages',
    'django.contrib.staticfiles',
    'boards',
    'widget_tweaks',
]
修改templates/new_topic.html
{% extends 'base.html' %}

{% load widget_tweaks %}

{% block title %}Start a New Topic{% endblock %}

{% block breadcrumb %}
    <li class="breadcrumb-item"><a href="{% url 'home' %}">Boards</a></li>
    <li class="breadcrumb-item"><a href="{% url 'board_topics' board.pk %}">{{ board.name }}</a></li>
    <li class="breadcrumb-item active">New topic</li>
{% endblock %}

{% block content %}
    <form method="post" novalidate>
        {% csrf_token %}

        {% for field in form %}
            <div class="form-group">
                {{ field.label_tag }}

                {% if form.is_bound %}
                    {% if field.errors %}

                        {% render_field field class="form-control is-invalid" %}
                        {% for error in field.errors %}
                            <div class="invalid-feedback">
                                {{ error }}
                            </div>
                        {% endfor %}

                    {% else %}
                        {% render_field field class="form-control is-valid" %}
                    {% endif %}
                {% else %}
                    {% render_field field class="form-control" %}
                {% endif %}

                {% if field.help_text %}
                    <small class="form-text text-muted">
                        {{ field.help_text }}
                    </small>
                {% endif %}
            </div>
        {% endfor %}

        <button type="submit" class="btn btn-success">Post</button>
    </form>
{% endblock %}
在templates文件夹中,创建一个名为includes的新文件夹
在includes文件夹中,创建一个名为form.html的文件:
{#templates/includes/form.html#}

{% load widget_tweaks %}

{% for field in form %}
  <div class="form-group">
    {{ field.label_tag }}

    {% if form.is_bound %}
      {% if field.errors %}
        {% render_field field class="form-control is-invalid" %}
        {% for error in field.errors %}
          <div class="invalid-feedback">
            {{ error }}
          </div>
        {% endfor %}
      {% else %}
        {% render_field field class="form-control is-valid" %}
      {% endif %}
    {% else %}
      {% render_field field class="form-control" %}
    {% endif %}

    {% if field.help_text %}
      <small class="form-text text-muted">
        {{ field.help_text }}
      </small>
    {% endif %}
  </div>
{% endfor %}
更改我们的new_topic.html模板:
{#templates/new_topic.html#}

{% extends 'base.html' %}

{% block title %}Start a New Topic{% endblock %}

{% block breadcrumb %}
  <li class="breadcrumb-item"><a href="{% url 'home' %}">Boards</a></li>
  <li class="breadcrumb-item"><a href="{% url 'board_topics' board.pk %}">{{ board.name }}</a></li>
  <li class="breadcrumb-item active">New topic</li>
{% endblock %}

{% block content %}
  <form method="post" novalidate>
    {% csrf_token %}
    {% include 'includes/form.html' %}
    <button type="submit" class="btn btn-success">Post</button>
  </form>
{% endblock %}
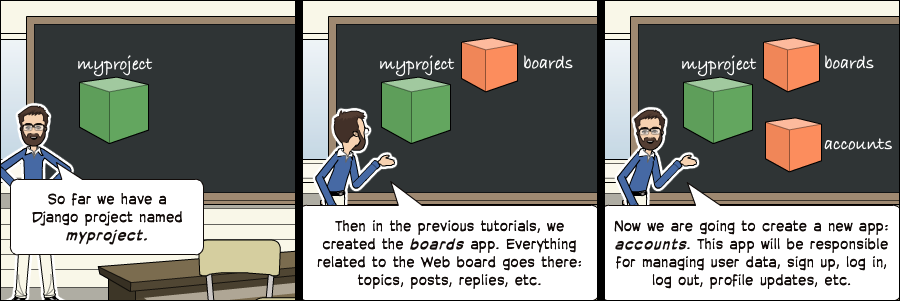
第四部分
Introduction
This tutorial is going to be all about Django’s authentication system. We are going to implement the whole thing: registration, login, logout, password reset, and password change.
You are also going to get a brief introduction on how to protect some views from non-authorized users and how to access the information of the logged in user.
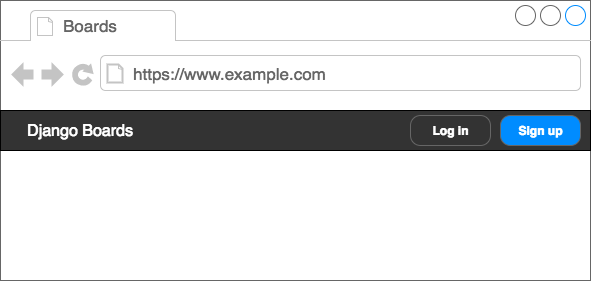
Wireframes
We have to update the wireframes of the application. First, we are going to add new options for the top menu. If the user is not authenticated, we should have two buttons: sign up and log in.
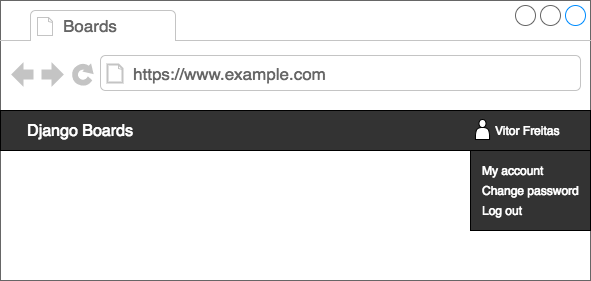
如果用户通过身份验证,我们应该显示他们的名字以及带有三个选项的下拉菜单:我的账户,更改密码和注销。
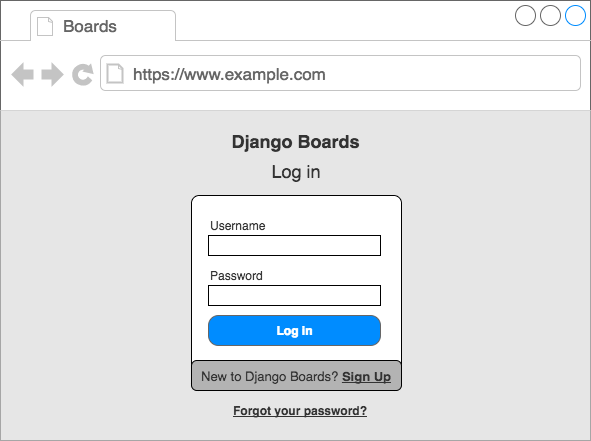
在 登录页面上,我们需要一个带有用户名和密码的表单,一个带有主要操作(登录)的按钮和两个备用路径:注册页面和密码重置页面。

在注册页面上,我们应该有一个包含四个字段的表单:用户名,电子邮件地址,密码和 密码确认。用户还应该能够访问登录页面。
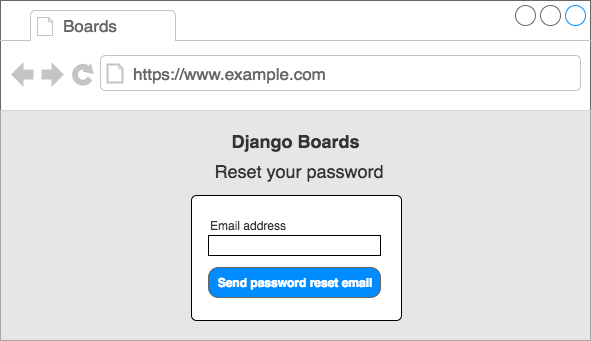
在密码重置页面上,我们将有一个只有电子邮件地址的表单。
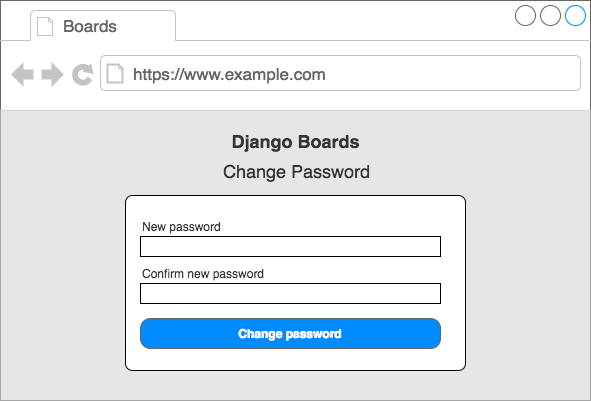
Then, after clicking on a special token link, the user will be redirected to a page where they can set a new password:
初始设置
To manage all this information, we can break it down in a different app. In the project root, in the same page where the manage.py script is, run the following command to start a new app:
django-admin startapp accounts
Next step, include the accounts app to the INSTALLED_APPS in the settings.py file:
INSTALLED_APPS = [
    'django.contrib.admin',
    'django.contrib.auth',
    'django.contrib.contenttypes',
    'django.contrib.sessions',
    'django.contrib.messages',
    'django.contrib.staticfiles',
    'accounts',
    'boards',
    'widget_tweaks',
]
4.1.注册
(1)myproject/urls.py添加注册
from accounts import views as accounts_views

urlpatterns = [
    url(r'^signup/$', accounts_views.signup,name='signup'),
]
(2)views.py
from django.shortcuts import render
from django.contrib.auth.forms import UserCreationForm


def signup(request):
    form = UserCreationForm()
    return render(request,'signup.html',{'form':form})
(3)修改base.html
添加{% block stylesheet %}{% endblock %}和{% block body %}{% endblock body %}


{#templates/base.html#}

{% load static %}

<!DOCTYPE html>
<html lang="en">
<head>
    <meta charset="UTF-8">
    <title>{% block title %}Django Boards{% endblock %}</title>
    <link rel="stylesheet" href="{% static 'css/bootstrap.min.css' %}">
    <link href="https://fonts.googleapis.com/css?family=Peralta" rel="stylesheet">
    <link rel="stylesheet" href="{% static 'css/app.css' %}">
    {% block stylesheet %}{% endblock %}
</head>
<body>
{% block body %}

    <nav class="navbar navbar-expand-lg navbar-dark bg-dark">
        <div class="container">
            <a class="navbar-brand" href="{% url 'home' %}">Django Boards</a>
        </div>
    </nav>


    <div class="container">
        <ol class="breadcrumb my-4">
            {% block breadcrumb %}

            {% endblock %}
        </ol>
        {% block content %}
        {% endblock %}
    </div>
{% endblock %}
</body>
</html>
(4)创建signup.html,代码如下
{#templates/signup.html#}

{% extends 'base.html' %}

{% block body %}
    <div class="container">
        <h2>Sign up</h2>
        <form method="post" novalidate>
            {% csrf_token %}
            {% include 'includes/form.html' %}
            <button type="submit" class="btn btn-primary">Create an account</button>
        </form>
    </div>
{% endblock %}
(5)修改form.html
添加save
{{ field.help_text|safe }}


{#templates/includes/form.html#}

{% load widget_tweaks %}

{% for field in form %}
  <div class="form-group">
    {{ field.label_tag }}

    {% if form.is_bound %}
      {% if field.errors %}
        {% render_field field class="form-control is-invalid" %}
        {% for error in field.errors %}
          <div class="invalid-feedback">
            {{ error }}
          </div>
        {% endfor %}
      {% else %}
        {% render_field field class="form-control is-valid" %}
      {% endif %}
    {% else %}
      {% render_field field class="form-control" %}
    {% endif %}

    {% if field.help_text %}
      <small class="form-text text-muted">
        {{ field.help_text|safe }}
      </small>
    {% endif %}
  </div>
{% endfor %}
访问:http://127.0.0.1:8000/signup/
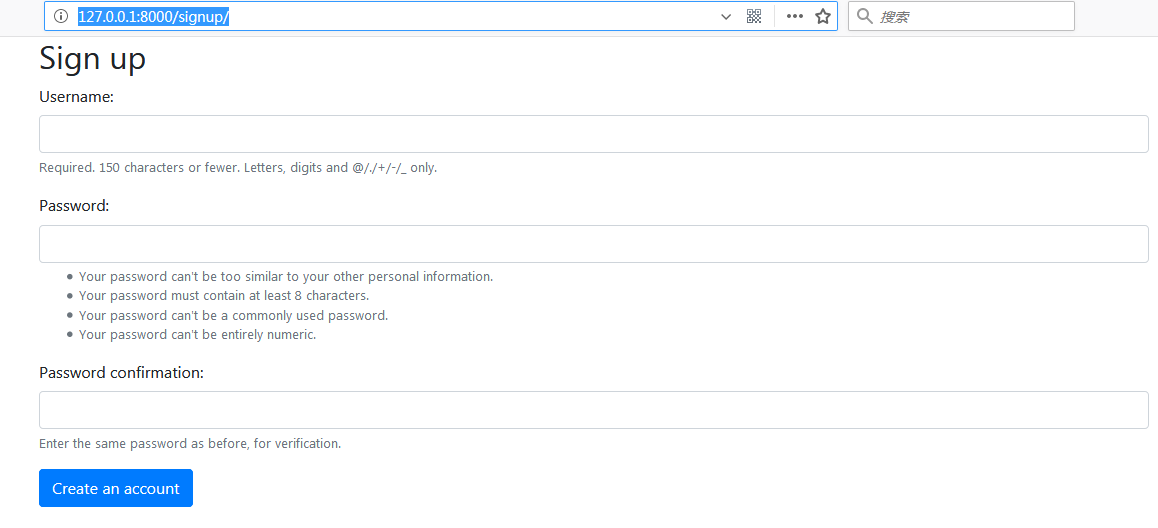
(6)注册视图中实现业务逻辑:
def signup(request):
    if request.method == 'POST':
        form = UserCreationForm(request.POST)
        if form.is_valid():
            user = form.save()
            login(request,user)
            return redirect('home')

    else:
        form = UserCreationForm()
    return render(request,'signup.html',{'form':form})
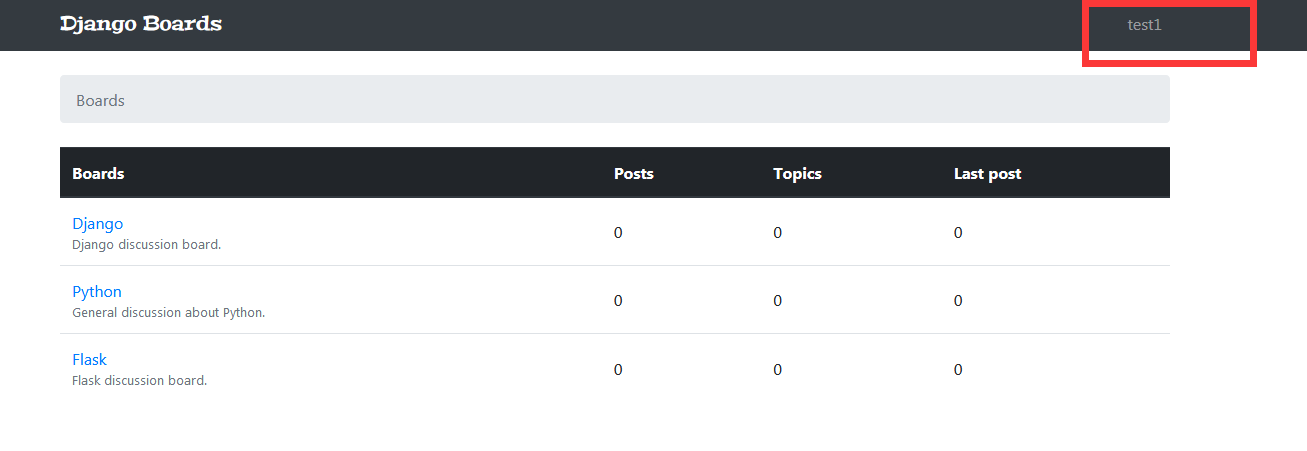
然后注册一个用户“test1”,看是否跳到home页面
(7)模板中引用已验证的用户
我们如何知道它是否有效?那么,我们可以编辑base.html模板,以在顶部栏上添加用户的名称
{#templates/base.html#}

{% load static %}

<!DOCTYPE html>
<html lang="en">
<head>
    <meta charset="UTF-8">
    <title>{% block title %}Django Boards{% endblock %}</title>
    <link rel="stylesheet" href="{% static 'css/bootstrap.min.css' %}">
    <link href="https://fonts.googleapis.com/css?family=Peralta" rel="stylesheet">
    <link rel="stylesheet" href="{% static 'css/app.css' %}">
    {% block stylesheet %}{% endblock %}
</head>
<body>
{% block body %}

    <nav class="navbar navbar-expand-sm navbar-dark bg-dark">
        <div class="container">
            <a class="navbar-brand" href="{% url 'home' %}">Django Boards</a>
            <button class="navbar-toggler" type="button" data-toggle="collapse" data-target="#mainMenu"
                    aria-controls="mainMenu" aria-expanded="false" aria-label="Toggle navigation">
                <span class="navbar-toggler-icon"></span>
            </button>
            <div class="collapse navbar-collapse" id="mainMenu">
                <ul class="navbar-nav ml-auto">
                    <li class="nav-item">
                        <a class="nav-link" href="#">{{ user.username }}</a>
                    </li>
                </ul>
            </div>
        </div>
    </nav>


    <div class="container">
        <ol class="breadcrumb my-4">
            {% block breadcrumb %}

            {% endblock %}
        </ol>
        {% block content %}
        {% endblock %}
    </div>
{% endblock %}
</body>
</html>
主要用到 {{ user.username }} 显示当前的登录用户名
(8)电子邮件字段添加到窗体
UserCreationForm不会提供一个电子邮件字段。但我们可以扩展它。
在accounts文件夹中创建一个名为forms.py的文件:
accounts/ forms.py