nCov项目总结文档
前言
通过Flask搭建web/Echarts可视化大屏,并定时获取数据。
参考视频:here
项目介绍
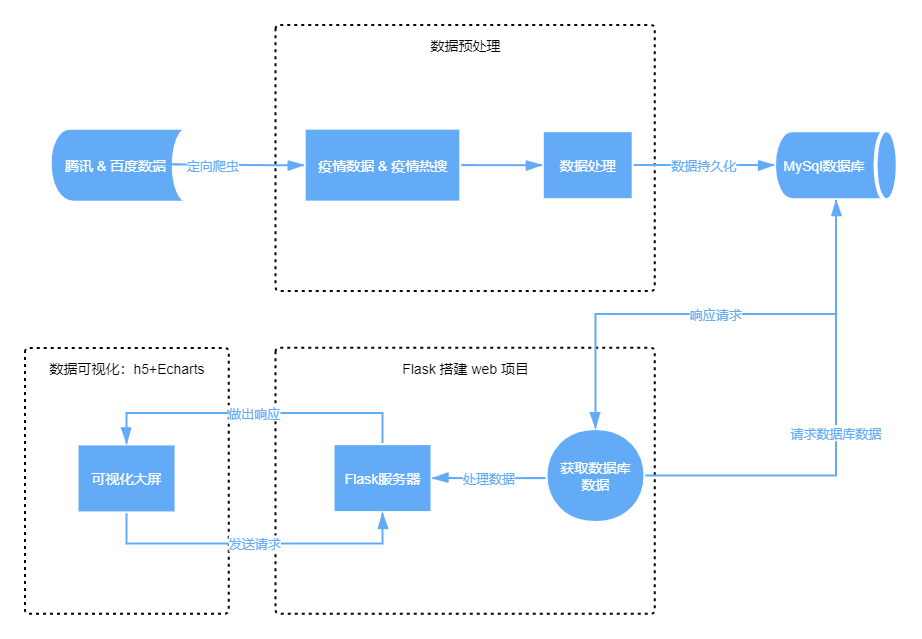
基于Python+Flask+Echarts的Epidemic监控系统,主要技术路线如下:
-
Python爬虫
-
Python操作MySql数据库
-
使用Flask构建web项目
-
基于Echarts的数据可视化展示
-
在Linux上部署web项目以及定时获取数据
-
nCov数据可视化大屏流程:
-
项目结构安排:
├── app.py    #Flask启动文件
├── chromedriver_win32    #chrome浏览器驱动
│   └── chromedriver.exe
├── db.py     #数据库连接配置
├── log       #存放爬虫日志
│   └── log_his
├── __pycache__
│   ├── app.cpython-36.pyc
│   ├── db.cpython-36.pyc
│   └── utils.cpython-36.pyc
├── requirements.txt    #收集到的依赖包
├── sh		 #shell脚本用于快速启动爬虫
│   ├── start_by_gunicorn.sh
│   ├── up_det.sh
│   ├── up_his.sh
│   └── up_hot.sh
├── spider.py  #爬虫文件
├── sqlfile    #相应的数据库脚本文件
│   ├── 000-details.sql
│   ├── 001-history.sql
│   ├── 002-hotsearch.sql
│   ├── 003-word.sql
│   ├── cov.sql
│   └── getCityTop5.sql
├── static    #静态资源
│   ├── css
│   │   └── main.css
│   │   └── word.css
│   ├── image
│   │   ├── bgg.png
│   │   ├── footer.png
│   │   ├── icon.jpg
│   │   └── header.png
│   └── js
│       ├── api
│       │   └── Tencent_api.js
│       ├── china.js
│       ├── controller.js
│       ├── ec_center.js
│       ├── echarts.min.js
│       ├── ec_left1.js
│       ├── ec_left2.js
│       ├── ec_right1.js
│       ├── ec_right2.js
│       ├── jquery.js
│       ├── word
│       │   ├── controller_w.js
│       │   ├── ecc_world.js
│       │   ├── ec_world.js
│       │   ├── vintage.js
│       │   └── world.js
│       └── worldcloud.js
├── templates
│   ├── word.html
│   └── index.html   # 主页面
└── utils.py   #工具脚本,获取MySQL数据
数据获取
-
数据获取可以从各地区卫健委获取,也可通过腾讯、百度、天行数据的免费接口或网易实时数据接口。
-
本文采用腾讯数据和百度的热搜数据进行存储
self.url1 = "https://view.inews.qq.com/g2/getOnsInfo?name=disease_h5"   #实时数据
self.url2 = "https://view.inews.qq.com/g2/getOnsInfo?name=disease_other"  #历史数据
self.url = "https://voice.baidu.com/act/virussearch/virussearch?from=osari_map&tab=0&infomore=1" #百度热搜数据页面self.url3 = "https://api.inews.qq.com/newsqa/v1/automation/foreign/country/ranklist" #腾讯国外数据接口,实时。国家:182 self.url4 = "https://voice.baidu.com/newpneumonia/get?target=trend&isCaseIn=1&stage=publish" #百度国外数据接口,至前一日。国家:207 -
思路:分别在spider.py中创建:Word_data、Tencent_Data 和 Badidu_Hot 类用于操作爬取数据,并将爬取到的数据预处理后存入MySQL数据库。
-
数据存储:创建details、history、hotsearch、word表,用于存储爬取到的数据
create table details
(
  id int auto_increment comment '主键自增长'
  	primary key,
  update_time datetime null comment '更新时间',
  province varchar(50) null comment '省份',
  city varchar(50) null comment '城市',
  confirm int null comment '累计确诊',
  confirm_add int null comment '新增确诊',
  heal int null comment '治愈',
  dead int null comment '死亡'
)
comment '详细数据';
create table history ( ds datetime not null comment '日期' primary key, confirm int null comment '累积确诊', confirm_add int null comment '新增确诊', suspect int null comment '疑似', suspect_add int null comment '新增疑似', heal int null comment '治愈', heal_add int null comment '新增治愈', dead int null comment '死亡', dead_add int null comment '新增死亡', importedCase int null comment '累计境外输入', importedCase_add int null comment '新增境外输入' ) comment '历史数据记录';create table hotsearch ( id int auto_increment, dt datetime not null comment '时间', content varchar(255) null comment '内容', primary key (id, dt) ) comment '百度热搜数据';create table word ( id int auto_increment primary key, name varchar(50) null, update_time datetime null, confirm_add int null comment '新增确诊', confirm int null comment '累计确诊', heal int null comment '治愈', dead int null comment '死亡' ) comment '世界数据';
Web程序开发:可视化展示
-
通过Flask、h5和Echarts进行可视化的开发,前端页面数据获取通过Ajax进行请求,并通过js给Echarts组件赋值展示。
-
主界面:index.html
<!DOCTYPE html> <html> <head> <meta charset="utf-8"> <title>ncov</title> <script src="../static/js/jquery.js"></script> <script src="../static/js/echarts.min.js"></script> <script src="../static/js/china.js"></script> <script src="../static/js/worldcloud.js"></script> <link href="../static/css/main.css" rel="stylesheet" /> </head> <body> <div id="gyroContain"> <div id="header"> <div id="data"><!--其他信息--> <a href="#">CSDN</a> | <a href="#">世界Epidemic实时追踪</a> <br> 数据来源 : 腾讯 & 百度 </div> <div id="title"> <span>全国Epidemic实时跟踪</span> </div> <div id="time"></div> </div> <div id="footer"><!--页面低端--></div> <div id="l1">我是左1</div> <div id="l2">我是左2</div> <div id="c1"> <div class="num" id="num1"> <h1></h1> </div> <div class="num" id="num2"> <h1></h1> </div> <div class="num" id="num3"> <h1></h1> </div> <div class="num" id="num4"> <h1></h1> </div> <div class="txt"> <h2>累积确诊</h2> </div> <div class="txt"> <h2>剩余疑似</h2> </div> <div class="txt"> <h2>累积治愈</h2> </div> <div class="txt"> <h2>累积死亡</h2> </div> </div> <div id="c2">我是中2</div> <div id="r1">我是右1</div> <div id="r2">我是右2</div> </div> <script src="../static/js/ec_center.js"></script> <script src="../static/js/ec_left1.js"></script> <script src="../static/js/ec_left2.js"></script> <script src="../static/js/ec_right1.js"></script> <script src="../static/js/ec_right2.js"></script> <script src="../static/js/controller.js"></script> </body> </html> -
效果展示:(若需要更好的界面,需通过css进行控制)
-
word.html
<!DOCTYPE html> <html lang="en"> <head> <meta charset="UTF-8"> <title>nCov—word</title> <link rel="icon" href="../static/image/icon.jpg"> <link href="../static/css/word.css" rel="stylesheet"/> <script src="../static/js/jquery.js"> </script> <script src="../static/js/echarts.min.js"> </script> <script src="../static/js/word/vintage.js"> </script> <script src="../static/js/word/world.js"> </script> <script src="../static/js/word/controller_w.js"> </script> </head> <body> <div id="gyroContain"> <div id="area"> <a href="http://aiiyx.cn" target="_blank">博客</a> | <a href="/" target="_blank">中国Epidemic实时追踪</a> <br> 数据来源:百度 & 腾讯 </div> <div id="tit"> <span>世界Epidemic实时追踪</span> </div> <div id="tim"> 标题</div> <div id="left"> left</div> <div id="right"> right</div> </div> <script src="../static/js/word/ecc_world.js"> </script> <script src="../static/js/word/ec_world.js"> </script> </body> </html> -
效果展示:


项目部署
项目部署需要一台Linux服务器,可选择Aliyun服务器或是使用Vmware 创建一台服务器均可。本文采用Vmware创建一台Ubuntu servers 18.4服务器。
1、安装Vmware的教程网上挺多的,自行百度。
2、安装Ubuntu servers 18.4推荐参考:Ubuntu 18.04 LTS Server服务器安装图文教程
3、安装conda、并创建虚拟环境推荐参考:
4、安装文件上载工具:
安装命令:yum install lrzsz -y

使用命令:rz
5、将项目上载至Ubuntu服务器
6、Ubuntu安装MySQL,并配置远程连接,创建项目所需数据库
开发者模式部署
开发者模式部署,是正式上线前的测试部署,可以调试项目是否正常。
1、安装项目依赖库
2、更改db.py中的数据库连接配置
3、运行spider.py进行一次爬虫获取数据
4、运行app.py运行项目
5、通过Windows浏览器访问web页面
生产模式部署
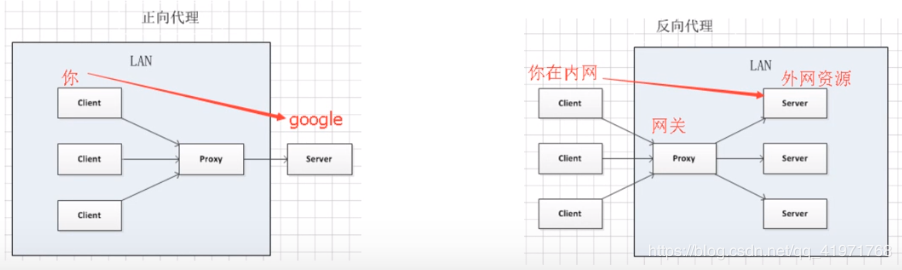
部署Flask应用时,通常使用WSGI的应用服务器搭配Nginx作为反向代理
常用的WSGI服务器:gunicorn、uwsgi
正向和反向代理:
安装nginx
静态服务器、动态服务、反向代理、负载均衡、缓存服务
-
apt安装:
sudo apt install nginx -
文件位置:
/usr/sbin/nginx :主程序 /etc/nginx :配置文件 /usr/share/nginx :存放静态文件 /var/log/nginx :存放日志 -
nginx命令:
service nginx start # 启动nginx service nginx reload # 重新加载nginx配置文件 nginx -s reopen # 重启nginx nginx -s stop # 停止nginx nginx -v # 查看版本号 -
配置可参考:here
cd /etc/nginx/ ,备份nginx.conf,修改nginx.conf
 ## 此处开始为配置反向代理
        upstream mysvr {
                server 127.0.0.1:5000; ## 服务器地址1
        }
        # error_page 404 /404.html

        server  {
                # keepalive_requests 120;
                listen 8080; ## nginx监听端口号
                server_name 192.168.121.139;   #cn.nCov.com; ## nginx监听服务器名称(本机ip或域名)
                location / {
                        proxy_pass http://mysvr;
                }
        }
        ## 设置反向代理结束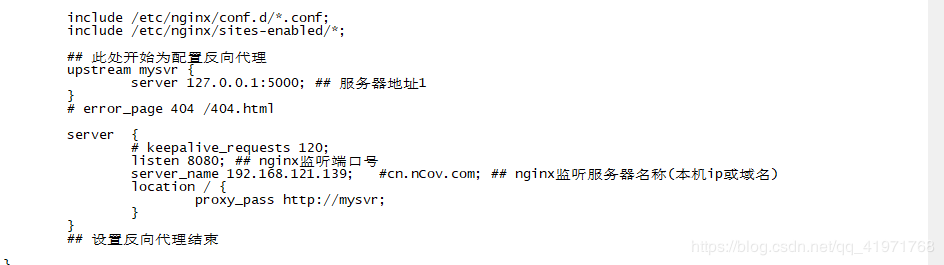
注: 查看有关nginx的所有目录列表,输入命令
rpm -ql nginx可以查看有关nginx目录信息,但是注意 这种命令只能是在基于yun安装的方式才可以。
1、安装 Gunicorn: (python虚拟环境下)
pip install gunicorn2、启动 Gunicorn:
gunicorn -b 127.0.0.1:8080 -D app:app编写脚本执行
#! /bin/bash
source /Anaconda/ls/envs/env_nCov/bin/activate env_nCov #env_nCov是conda创建的虚拟环境
cd /home/klein/workspace/nCOV/
gunicorn -b 127.0.0.1:5000 -D app:app
-w: 表示进程(worker) -b: 表示绑定ip地址和端口号(bind) -D: 以守护进程的形式启动,后台启动
例:gunicorn -w 2 -b 127.0.0.1:5000 运行文件名称:Flask程序实例名
查看后台进程:ps -ef | grep gunicorn
查询:首先执行如下命令获取Gunicorn进程树:
pstree -ap|grep gunicorn
关闭:首先执行如下命令获取Gunicorn进程树:
pstree -ap|grep gunicorn
之后输入如下指令关闭进程:
kill -9 pid
重启:输入如下指令重启进程:
kill -HUP pid
3、启动 Nginx在Windows下测试
定时获取数据
-
Ubuntu安装chrome:here
-
ubuntu三行命令安装chrome浏览器 : https://yq.aliyun.com/articles/58040
-
Ubuntu安装google Driver:https://blog.csdn.net/blueheart20/article/details/81566903
-
CENTOS7下使用SELENIUM进行网页自动化访问:http://aiiyx.cn/wz/1605/
-
编写虫子脚本:
- up_his.sh
#!/bin/bash source /Anaconda/ls/envs/env_nCov/bin/activate env_nCov #env_nCov是conda创建的虚拟环境 python3 /home/klein/workspace/nCOV/spider.py up_his >> /home/klein/workspace/nCOV/log/log_his- up_hot.sh
#!/bin/bash source /Anaconda/ls/envs/env_nCov/bin/activate env_nCov #env_nCov是conda创建的虚拟环境 python3 /home/klein/workspace/nCOV/spider.py up_hot >> /home/klein/workspace/nCOV/log/log_hot- up_det.sh
#!/bin/bash source /Anaconda/ls/envs/env_nCov/bin/activate env_nCov #env_nCov是conda创建的虚拟环境 python3 /home/klein/workspace/nCOV/spider.py up_det >> /home/klein/workspace/nCOV/log/log_det- up_word.sh
#!/bin/bash source /Anaconda/ls/envs/env_nCov/bin/activate env_nCov #env_nCov是conda创建的虚拟环境 python3 /home/klein/workspace/nCOV/spider.py up_word >> /home/klein/workspace/nCOV/log/log_word -
使用crontab定时虫子任务: https://blog.csdn.net/m0_38109046/article/details/87918111
-
输入:crontab -e
30 * * * * bash /home/klein/workspace/nCOV/sh/up_his.sh 2>&1 &
3 */2 * * * bash /home/klein/workspace/nCOV/sh/up_hot.sh 2>&1 &
*/5 * * * * bash /home/klein/workspace/nCOV/sh/up_det.sh 2>&1 &
* 1,5,9,13,17,21 * * * bash /home/klein/workspace/nCOV/sh/up_word.sh 2>&1 &

shell脚本激活conda虚拟环境
怎么用shell脚本激活conda虚拟环境?:
#!/bin/bash
source /YOUR_CONDA_PATH/bin/activate your_env
python --version
从Linux服务器下载文件
- 下载文件
sz file
- 上传文件
rz